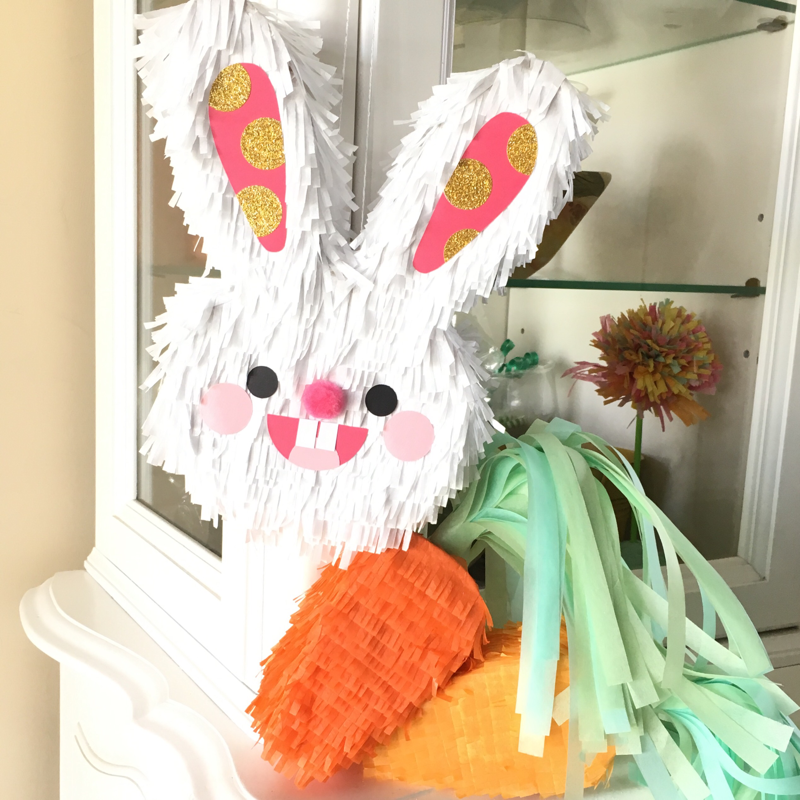
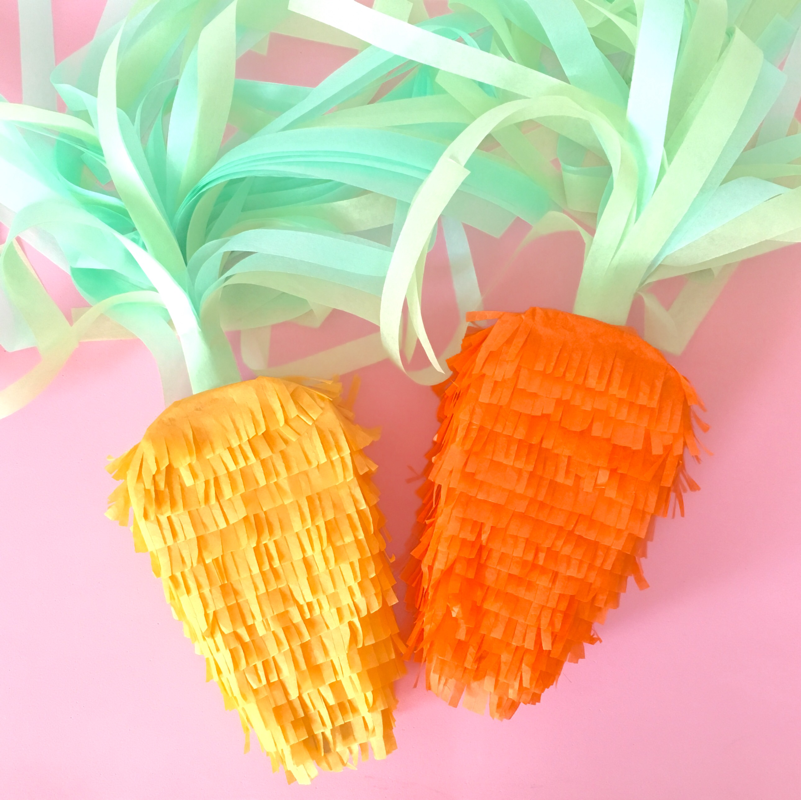
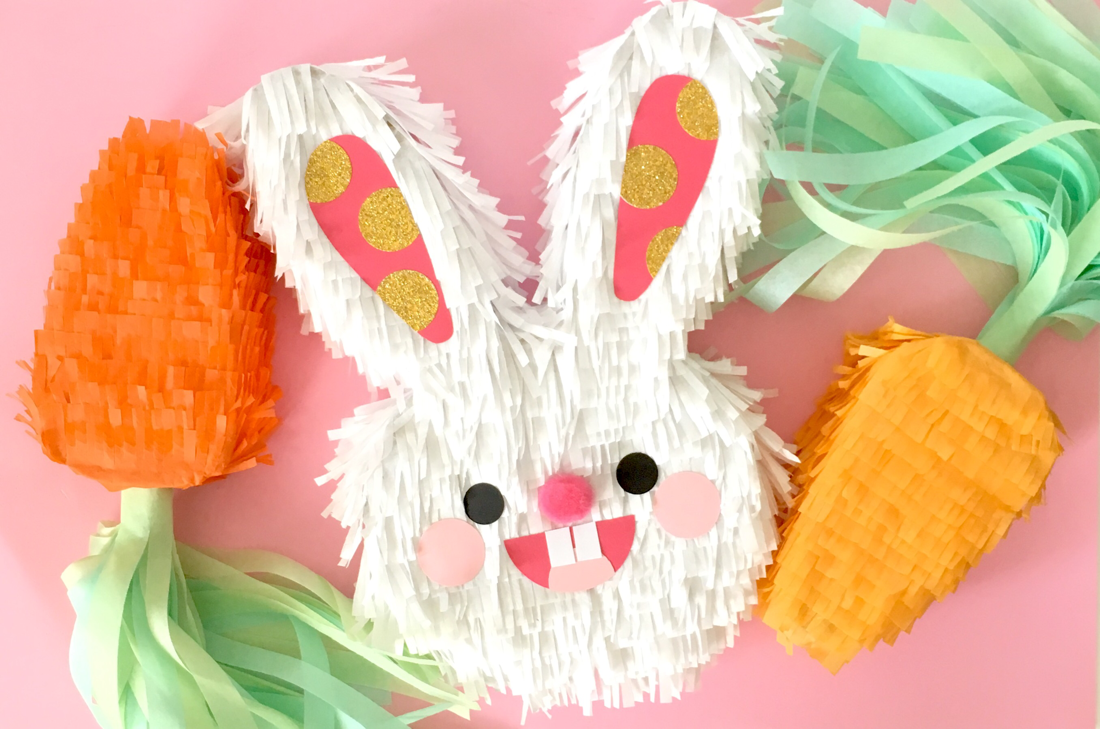
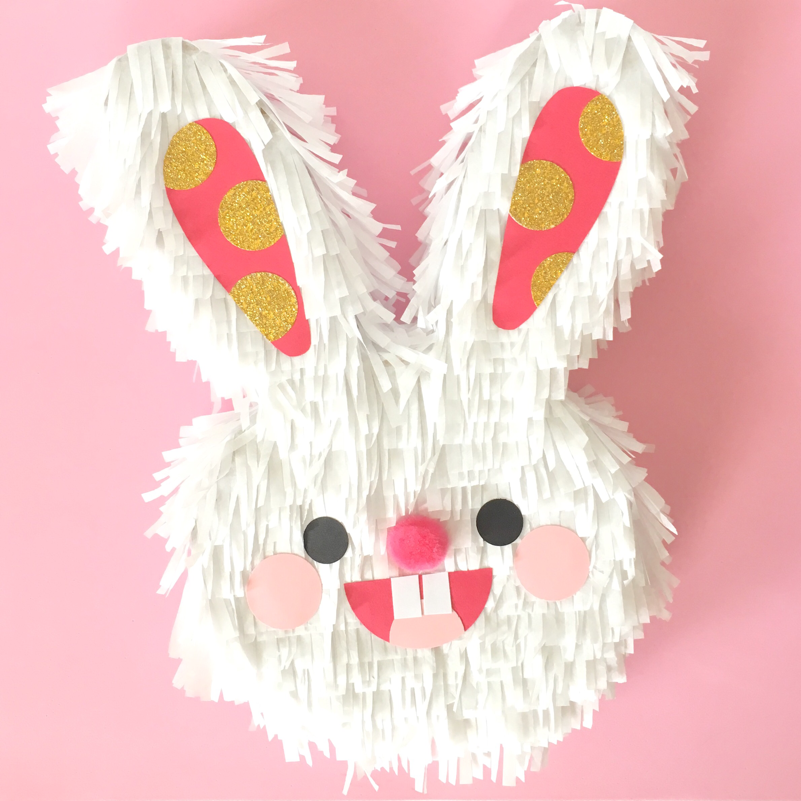
Bunny Piñata TutorialHippity hop this bunny is ready to pop! Create this cute bunny piñata for your Easter festivities complete it with mini carrot piñatas too! I think piñatas are great for any season or holiday plus there's so many ways and shapes you can make. How awesome are these carrots and bunny head? There's something really intriguing about piñatas perhaps it's the layers of fringe that create an interesting and pleasing texture to the eyes, or perhaps it's the mystery of what lies inside? It could be the thought of how much fun the kids will have whacking it, they really do have a sense of attraction to "violence" haha but I believe a whack at a piñata is a fine way of letting out a healthy dose of satisfying this need. Uh I have every intention of keeping these piñatas fully intact, just so ya know! 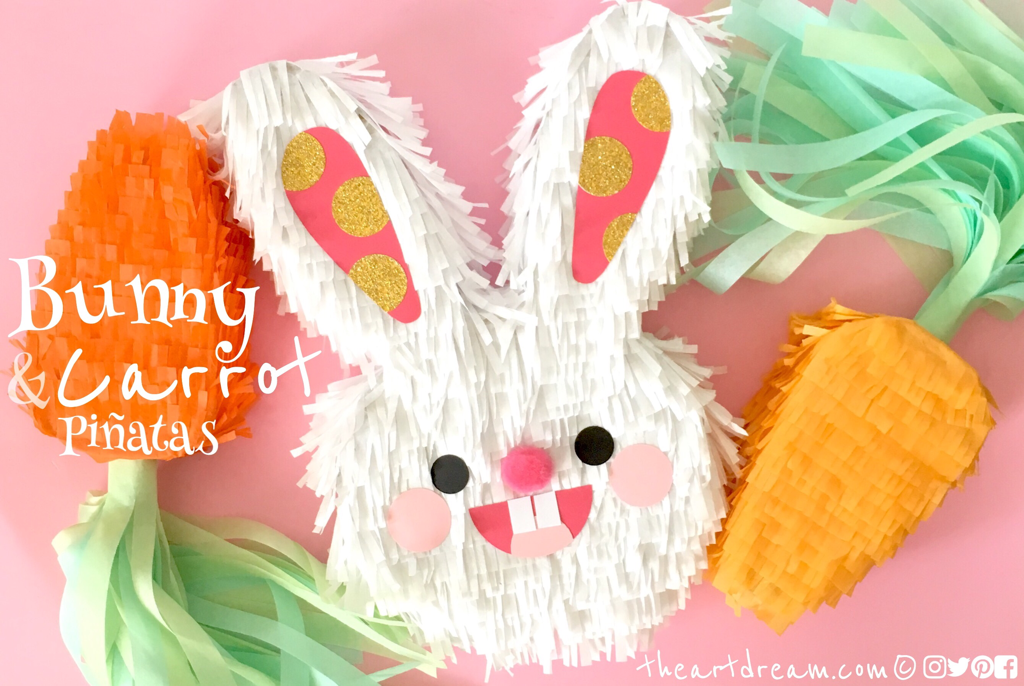 Bunny & Carrot Piñatas Here's a quick tutorial on how I made this piñata, I did not make it with papier mâché this time, I used a cardboard box from all that online ordering we do in my house, there surely isn't a shortage of boxes so why not use 'em. So technically this project is partially a recycled one. Materials:
Directions: Step 1. First you'll want to create your patterns for the bunny and carrot. Fold a piece of paper in half and draw one half of your pattern on the fold, then cut it out. Step 2. Trace the pattern onto the cardboard, you'll need two pieces for each piñata. Step 3. Cut a long strip of cardboard about 1.5 inches wide. You might need several of these. Step 4. Glue the strip along the edges of the bunny vertically, remember to leave a portion unglued if you want to fill it up with candy. Continue all around the edges. Step 5. At this point you may want to thread some string in your piñata if you'd like to hang it. Step 6. Glue the second shape on top. 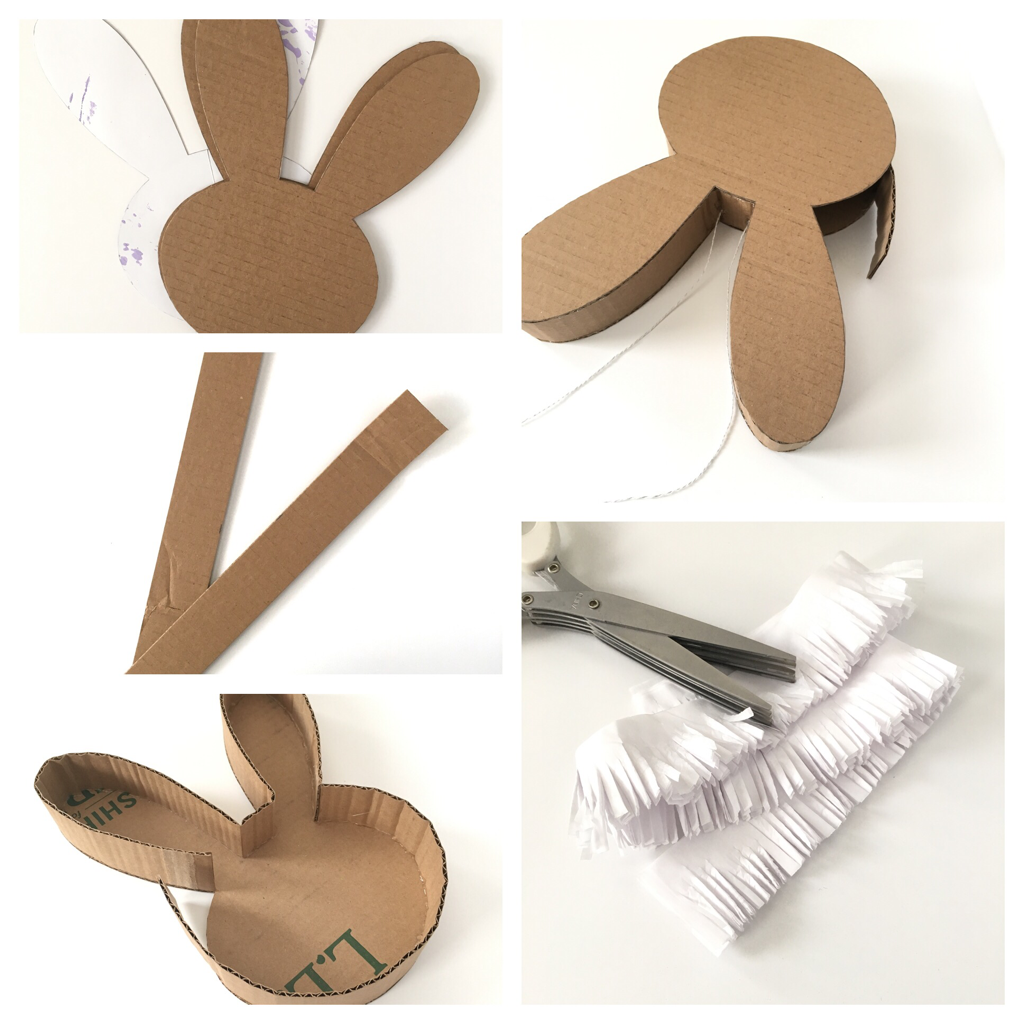 Step 7. Cut strips of tissue paper at 1.5 inches, then cut fringe in it as well. You can do this with a regular scissor or use a hand shredding scissor. Step 8. Glue fringe along the side of the piñata then start at the bottom of the piñata and glue on the fringe horizontally until you cover the whole thing. 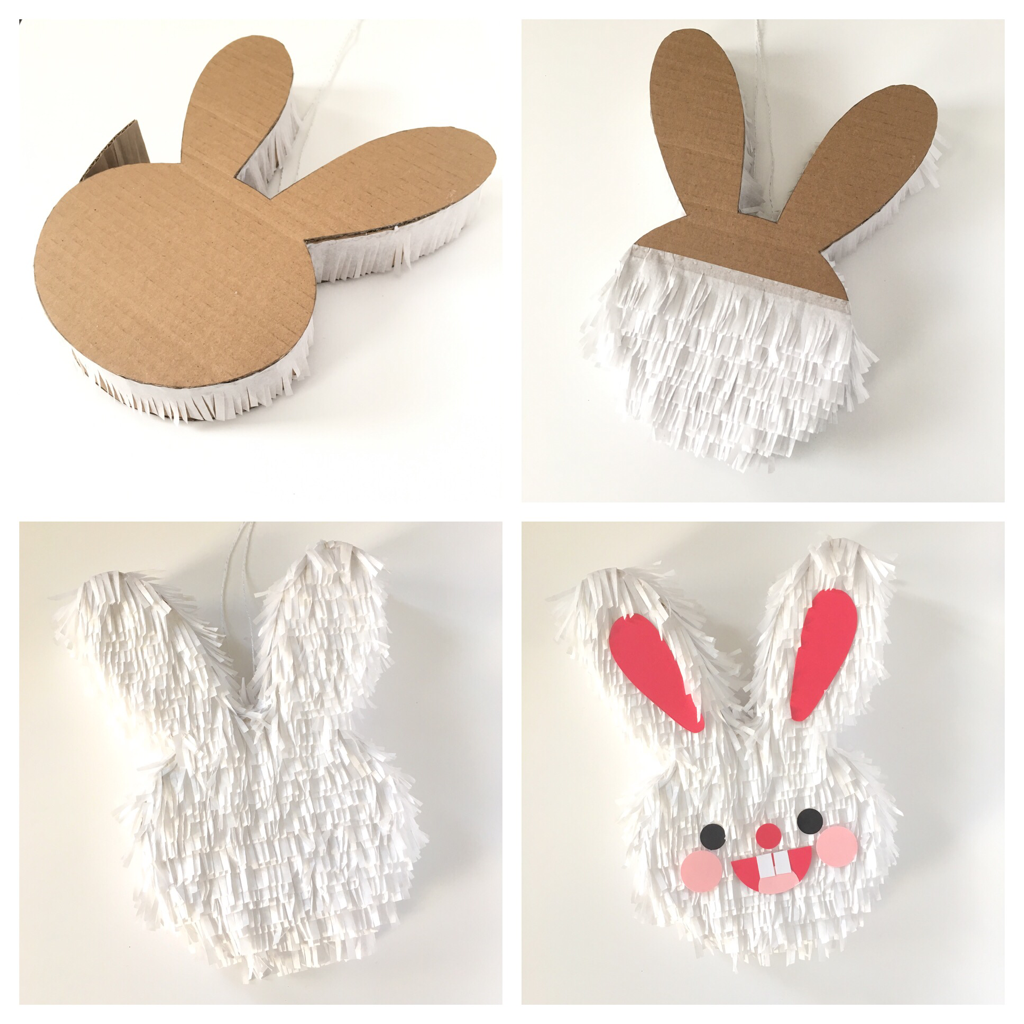 Step 9. Add any kind of facial features you'd like. Have an egg-mazing time making your piñatas!
1 Comment
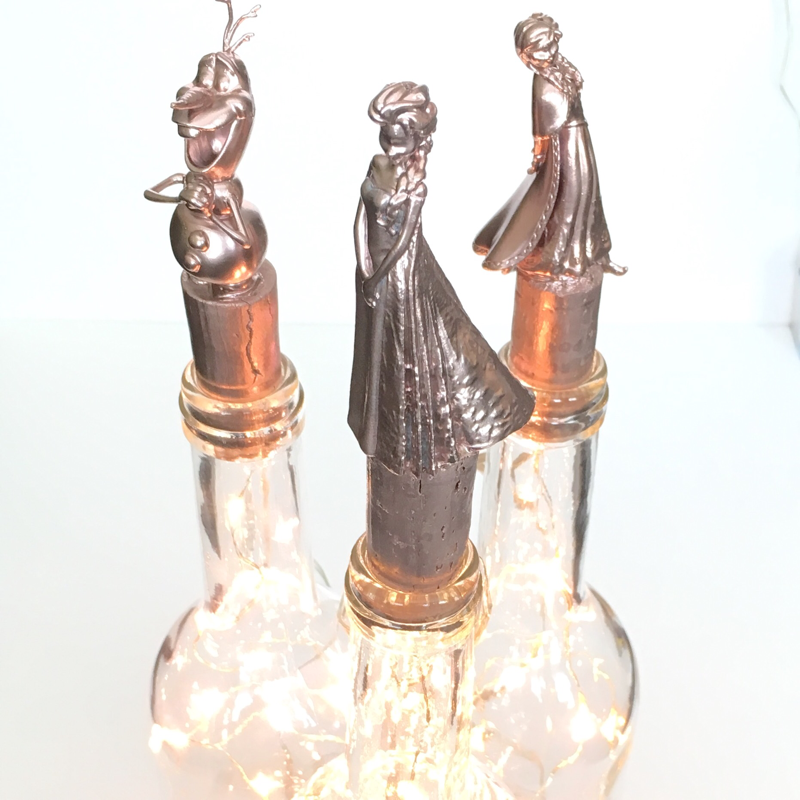
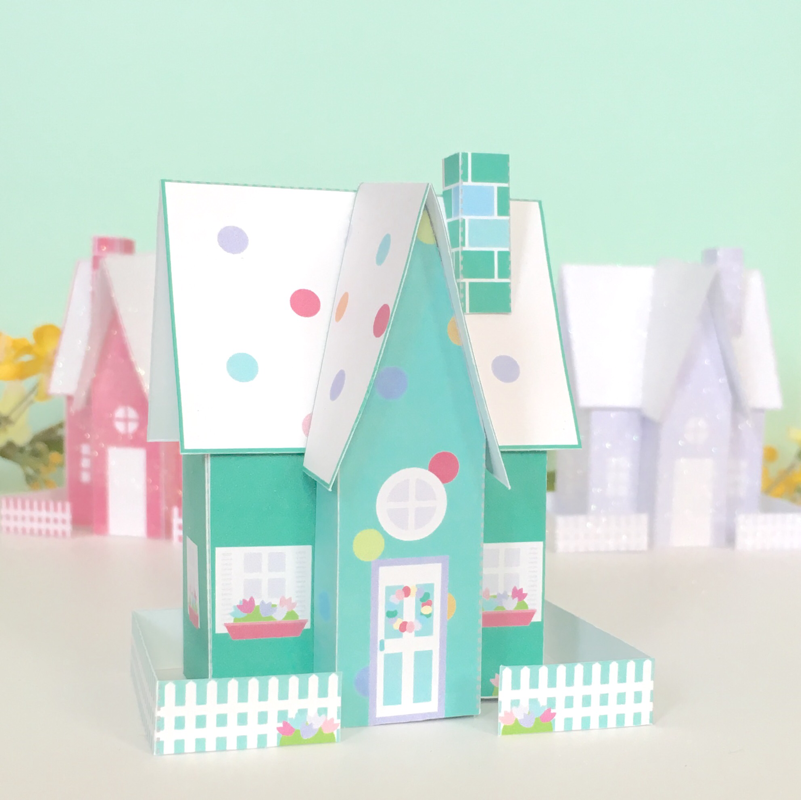
Wine Bottle Cork ToppersHave some wine bottle corks lying around? How about some small forgotten toys? Repurpose these materials to make awesome wine bottle toppers! Ok, so this idea is more for the adults, it combines a little bit of the kid's crafting world with that oh so popular grape drink I know you all like to indulge in! As a teacher I end up with many little trinkets left over, or some extra I haven't handed out yet, I'm sure your home is overflowing with this kinda "junk" too. I think it's always fun to repurpose or recycle these things before deciding to throw them away! Here I've transformed some small Frozen figurines into these super cool, modern and trendy wine bottle cork toppers! 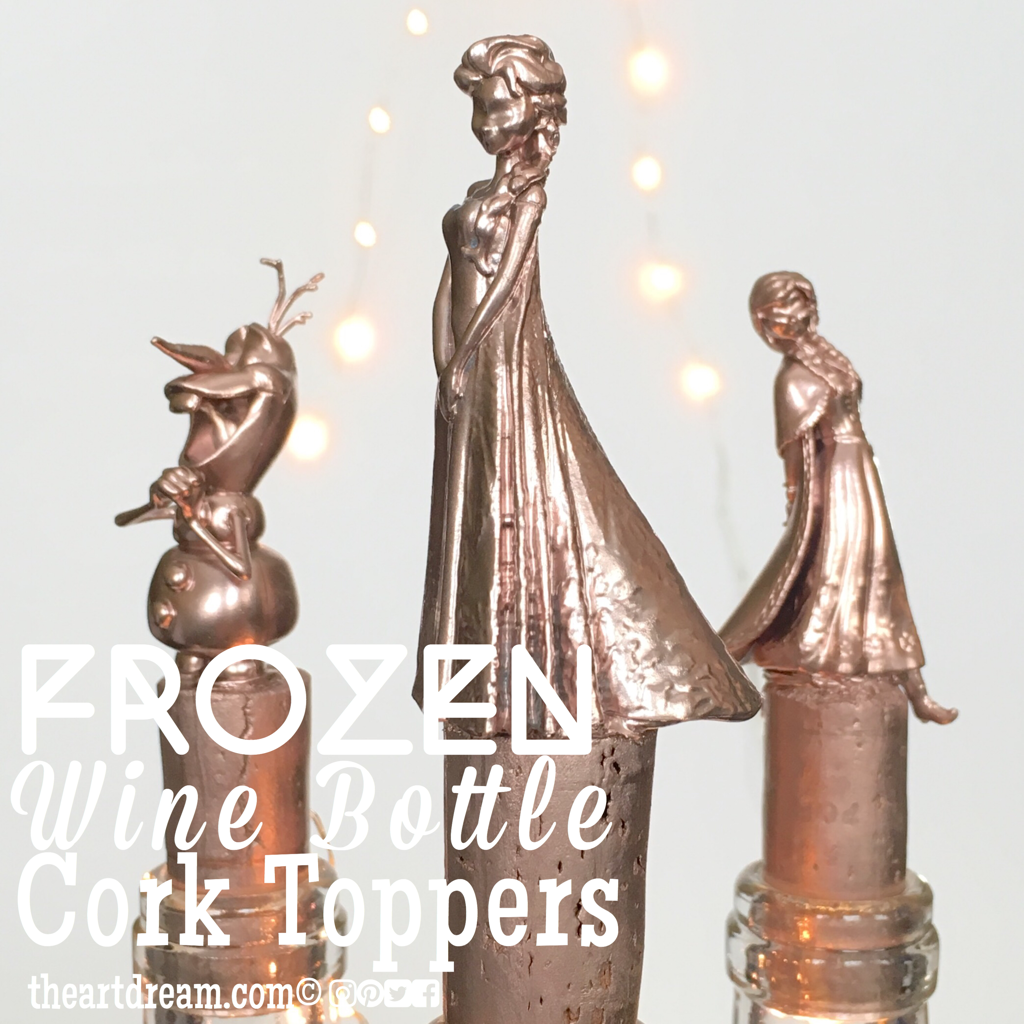 Elsa, Anna & Olaf Cork Toppers So this is a very simple craft you really don't even need a materials list or directions. All you need is wine corks, small toys and some spray paint. I bought these clear wine bottles from the craft store but you can use one you already own, plus I thought they'd look nice with string lights inside. So first you'll want to wash the toys with dish soap of course, the paint will adhere better. Then hot glue the toys to the cork and spray paint them, let them dry well for at least a day before you use them. I think these will make pretty cool gifts or maybe even favors. These Frozen toys are from the Dollar Tree, and now they sell or sorts of characters like Disney villains, Ninja Turtles and DC heroes. How about a super cool black spray painted Batman wine cork topper? That be cool! The string lights are the battery operated kind with bendable wire, they're made for jars and wreathes. Below is a quick video to show you how I made 'em. Spring Houses PapercraftBuild and display these vibrant spring paper houses. The design is charming, traditional and modern all at the same time. I've mentioned before that I love creating and assembling these little paper houses, I think a village is a very prominent image of our typical lives, they represent the very fabric of our everyday existence. Houses are a symbol of our homes, the love we share in them and the memories we make. A display of small homes shows how important this environment is to you. Download these three paper houses in the shop here at The Art Dream. 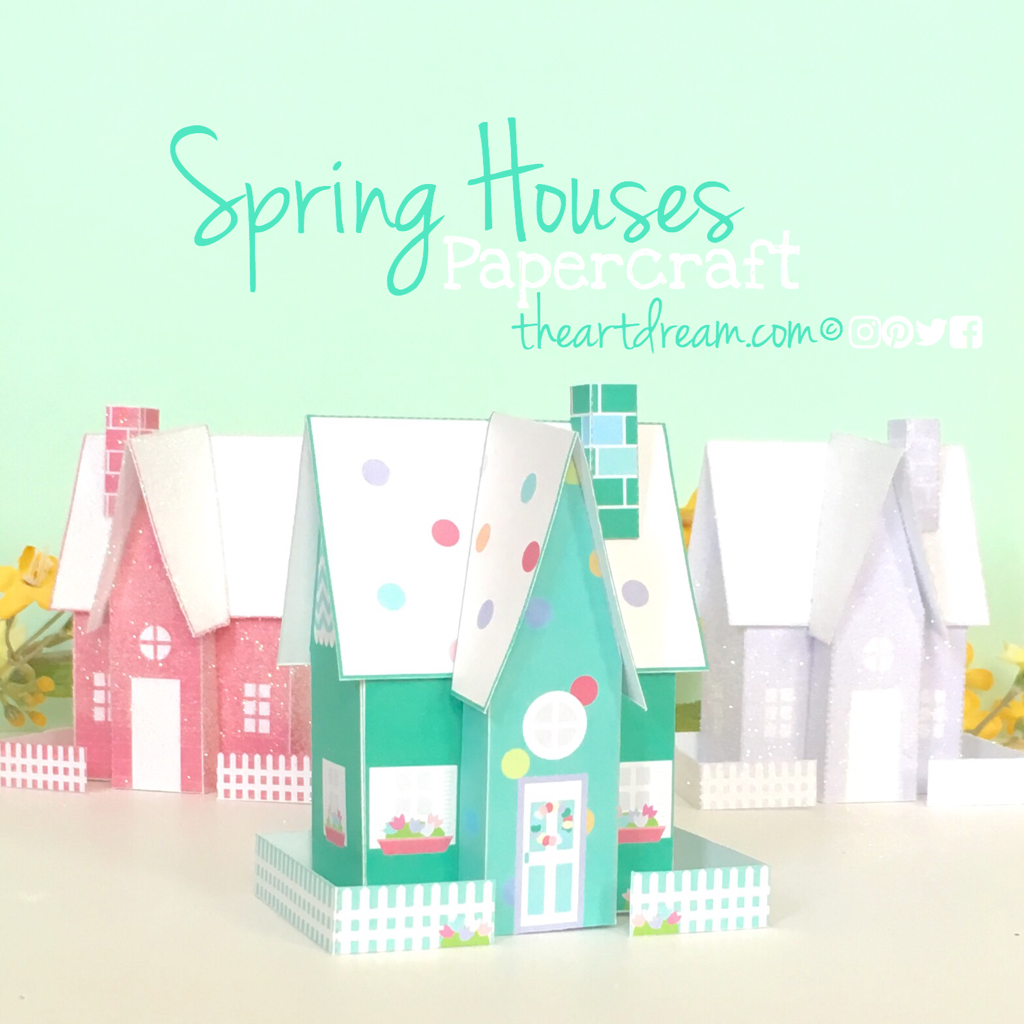 Turquoise, Pink & Lavender Paper Houses The design of these paper houses are by far my favorite. The addition of the fence makes these houses stand out and it really gives a warm feeling to them as well. Be sure to add your own touches to these paper houses, I've covered the pink and purple ones with glitter to make them shine a bit more. These houses really are dressed up perfectly for spring. You could even place a battery operated t-light under them and make them glow warmly. How about displaying these in a Easter basket, you could even fill them with candy, or perhaps these would make a nice house warming gift! Be sure to visit my shop to get this download! Check out this video of me making one of these awesome houses! These houses will look fantastic wherever you place them!
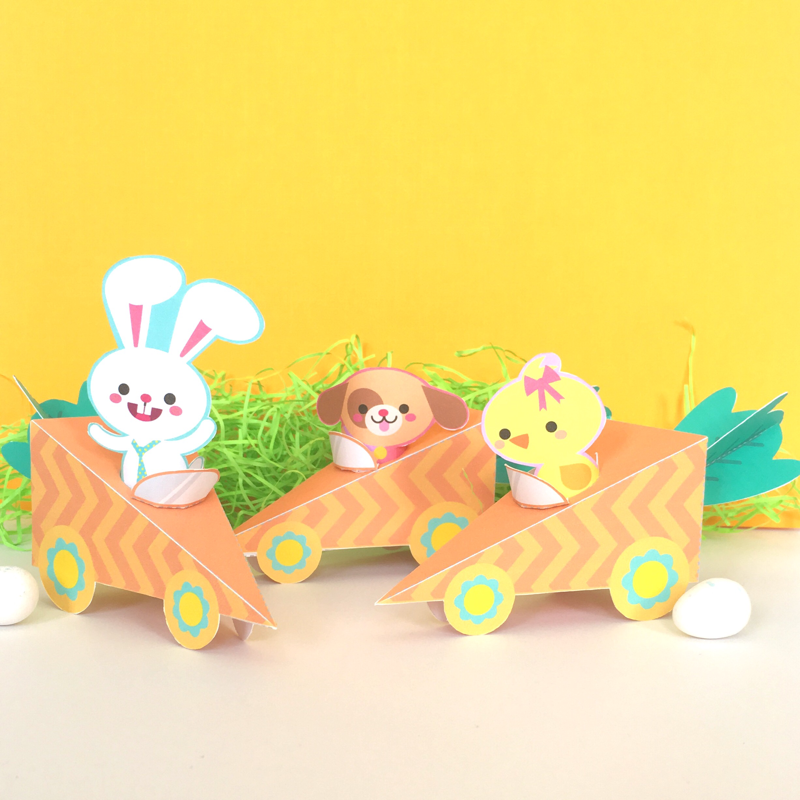
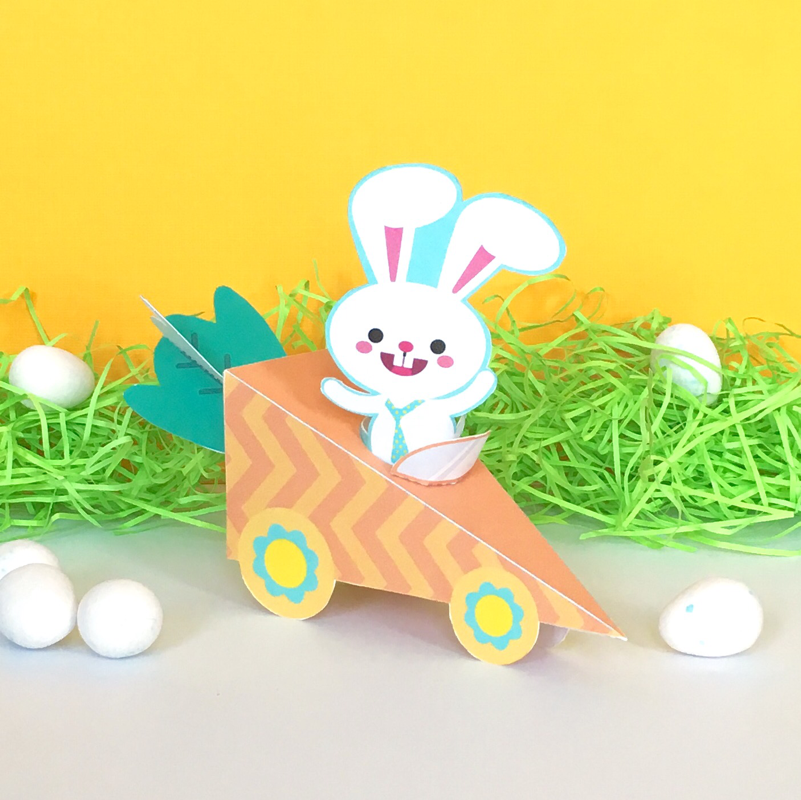
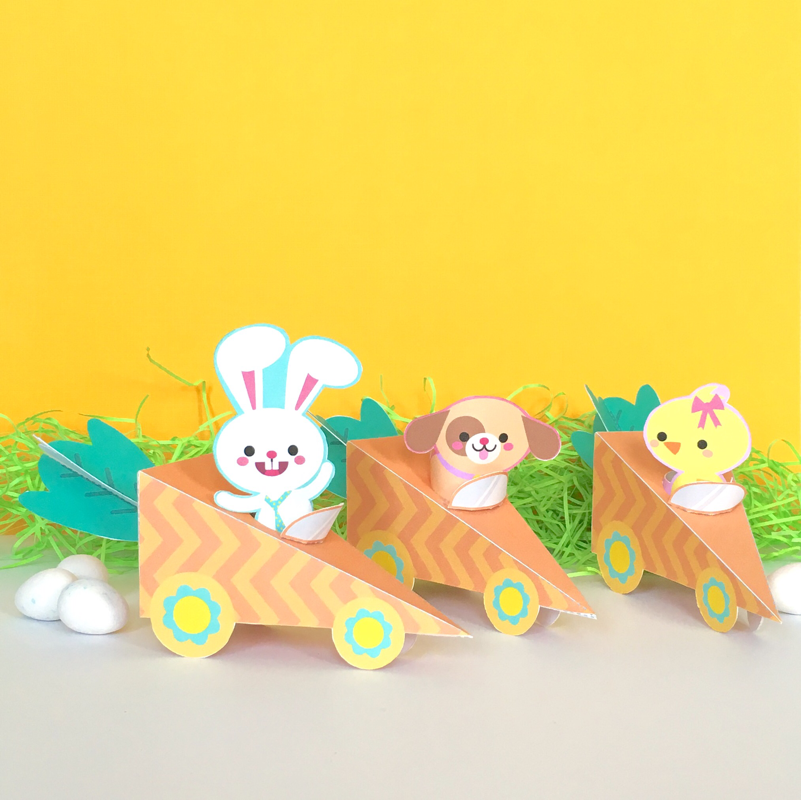
Easter Carrot Racers PapercraftI had previously posted my little Easter egg holder friends in an earlier post this month, and I got to thinking that this trio would be suited to have their own carrot race cars! This bunny, chick and puppy are ready to race around the egg hunt collecting as many eggs as possible, put together this easy papercraft at your next Easter craft party. See more fun and exciting printables in my shop too! 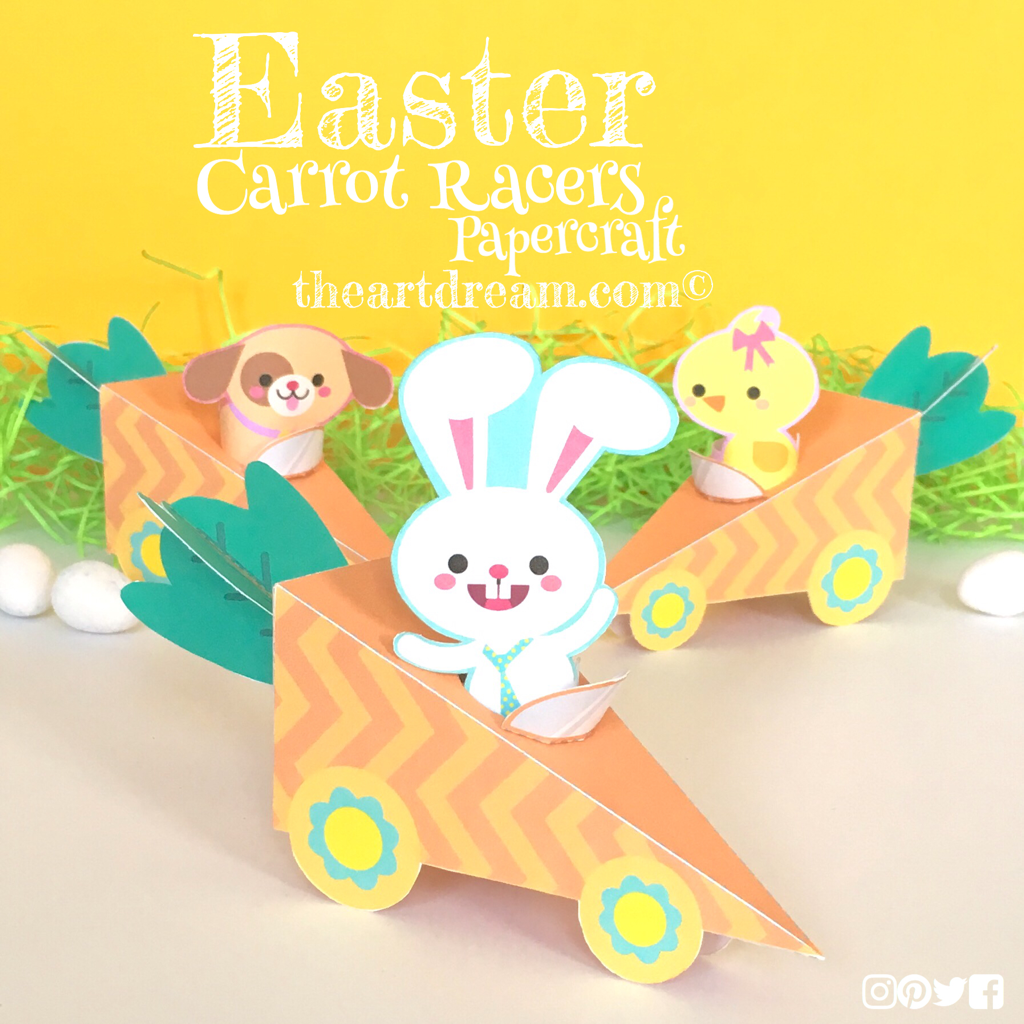 Bunny, Chick & Puppy in Carrot Race Cars How adorable are these little Easter critters in their carrot cars?! I'm gonna have these set up on the table when we get ready to dye our Easter eggs, this way the kids can have a little play time while they wait for the eggs to dry. Or why not have this ready to go for the kids to make themselves. Download my free printable right below! The bunny, chick and puppy are made separately so you can remove them from their cars, and they double as little finger puppets too!
Materials:
Directions: Step 1. Print out the page on white cardstock. Then cut out all of the shapes with your scissor or craft knife. Step 2. Score all of the dotted lines with your craft knife or you can use the corner of a credit card. Scoring helps to fold all of the flaps. Step 3. Cut out the hole on the top of the carrot car, this is where the animals will sit. Cut slits on the " x" on the back of the carrot, this is where the green stem goes. Step 4. Assemble your car by folding and aligning the flaps, glue them down as you go along. Glue on the triangular bottom as well. Step 5. Cut the dotted lines on the stems, interlock them and insert them through the "x" on the back of the carrot car. Step 5. Assemble the animals by curling the bottom rectangle around your finger and glueing the flap down. I hope you love these little critters driving around in carrots as much as I do!
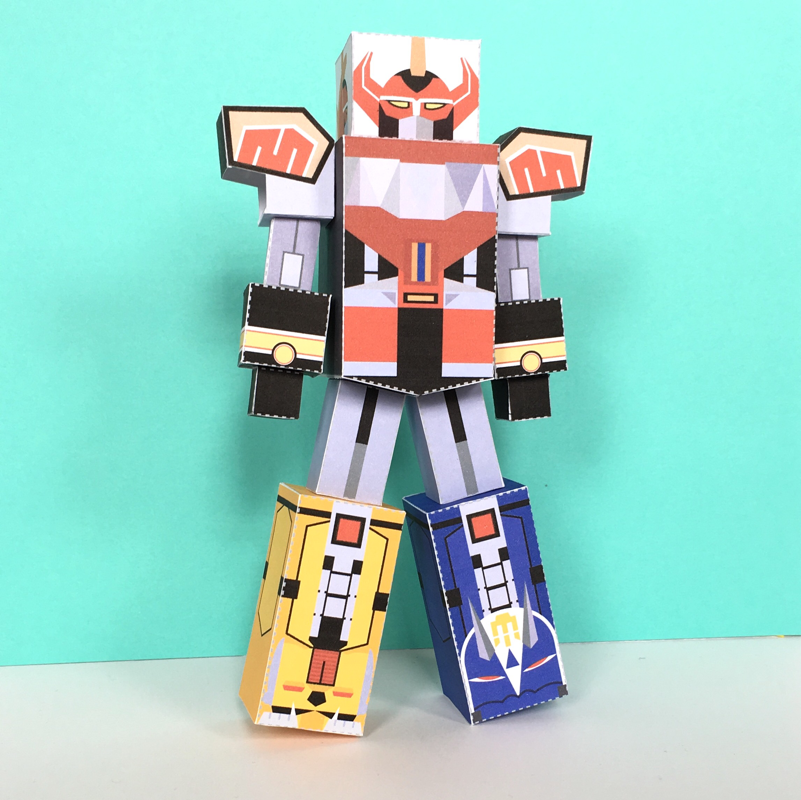
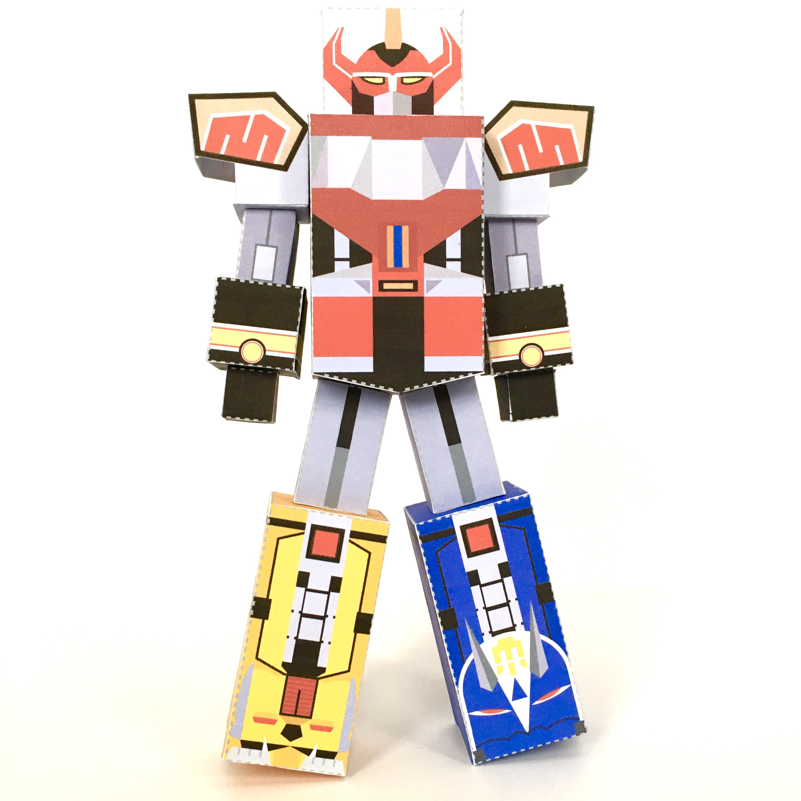
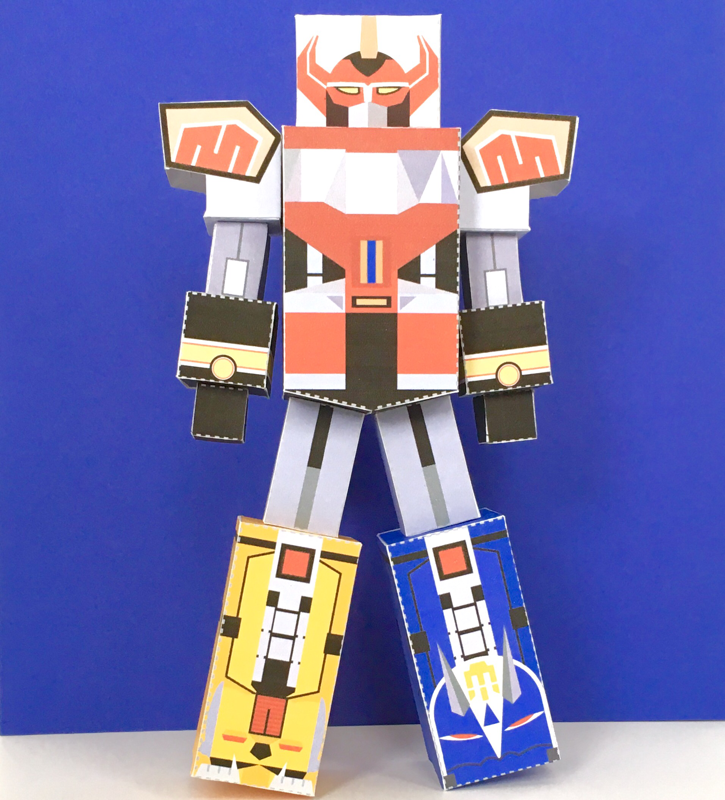
Megazord PapercraftGo, Go Power Rangers, and that mighty Megazord! He's larger than life and ready to defeat Rita Repulsa! This easy papercraft will surely keep your little rangers crafting all day! Oh how was I such a Power Rangers super fan when I was younger. I was the kid getting off the bus at 3;00 and running home to turn on the Power Rangers! The show was quite entertaining and had me jumping around the house believing I was a Power Ranger myself! Your younger kids will definitely love putting together this Megazord papercraft inspired by the original, he's bigger and cooler than a lot of my other papercrafts! If you like this craft then check out some of my other papercrafts in the shop here at The Art Dream! 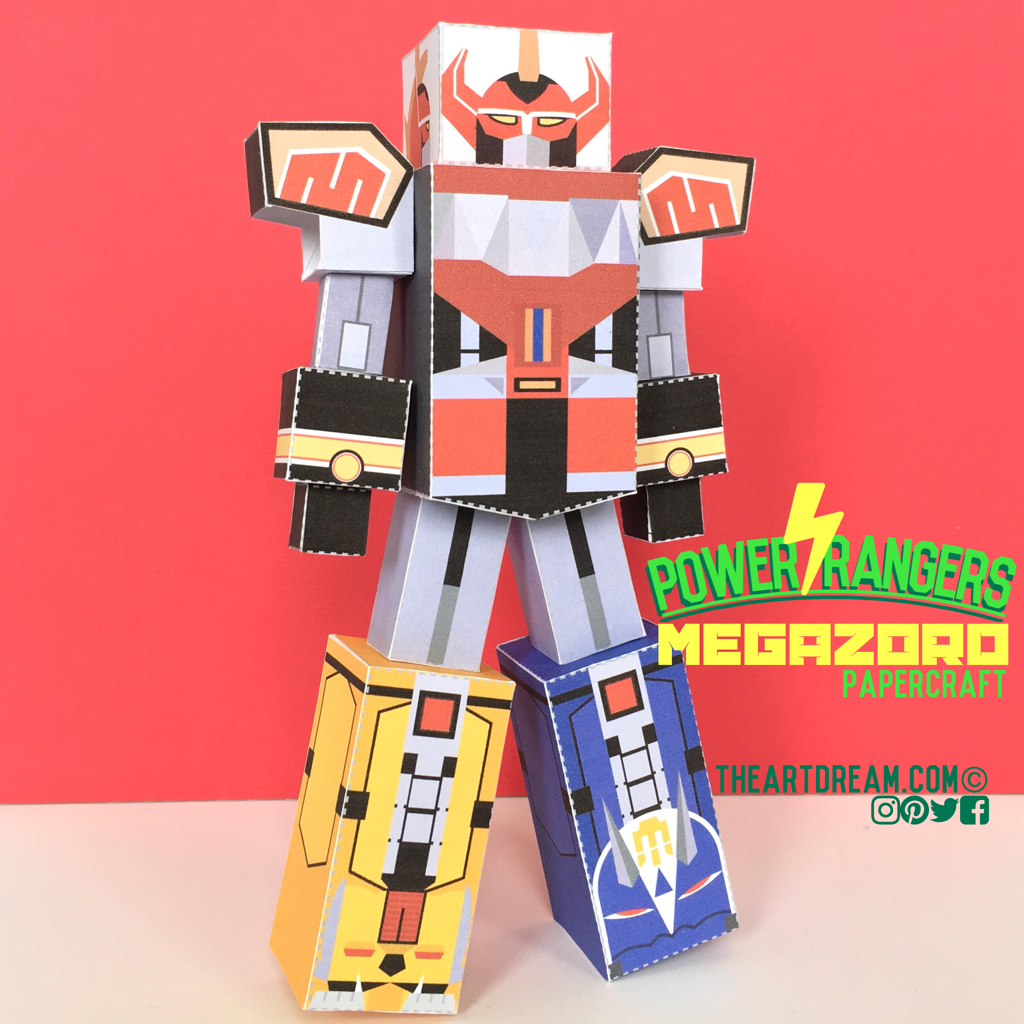 Megazord Papercraft Ok, so this papercraft has a lot more pieces than my previous creations and it is definitely the biggest. This one may not be for the youngest of kids but for the older ones for sure. All of the shapes are pretty much boxes, and when all glued together form this awesome Megazord! This guy was also created in anticipation of the Power Rangers remake coming at the end of the month! I really can't wait for this one, so much nostalgia and action to look forward to... anyway below are the files, there are 4 in total but you'll need to print the arm page twice to make two!
Materials:
Directions: Step 1. Print out all of the pages. Print out page 1 twice, this is the arm, you'll need two. Then cut out all of the shapes with your scissor or craft knife. Step 2. Score all of the dotted lines with your craft knife or you can use the corner of a credit card. Scoring helps to fold all of the flaps. Step 3. Fold up all of the shapes like a box, connecting the flaps to its corresponding side. Step 4. Repeat step 3 with all of the shapes. Step 5. Glue together your Megazord how you wish, use my photos for reference! You mighty morphin' Power Rangers!
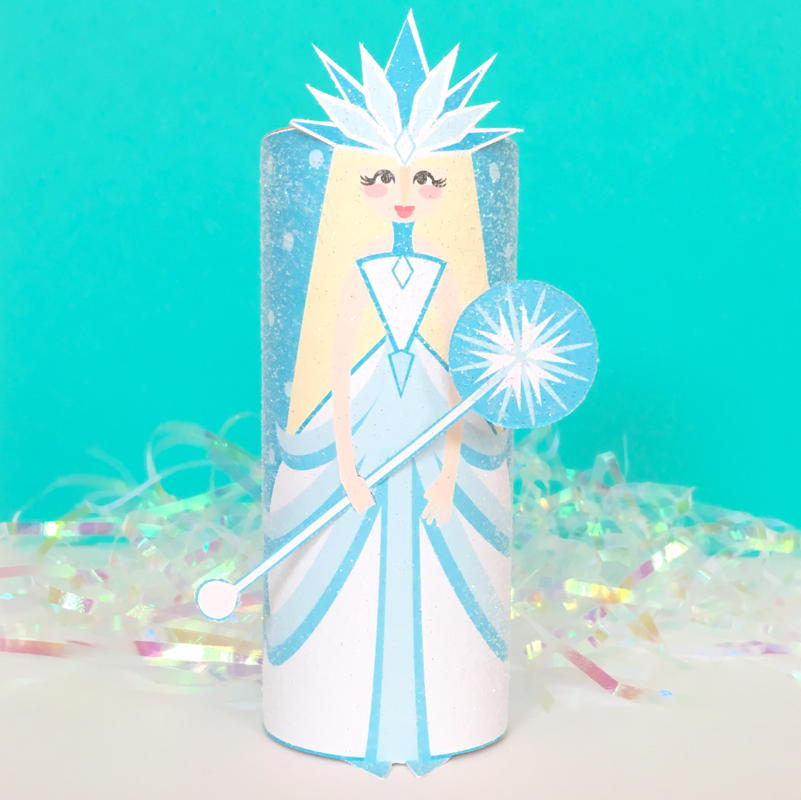
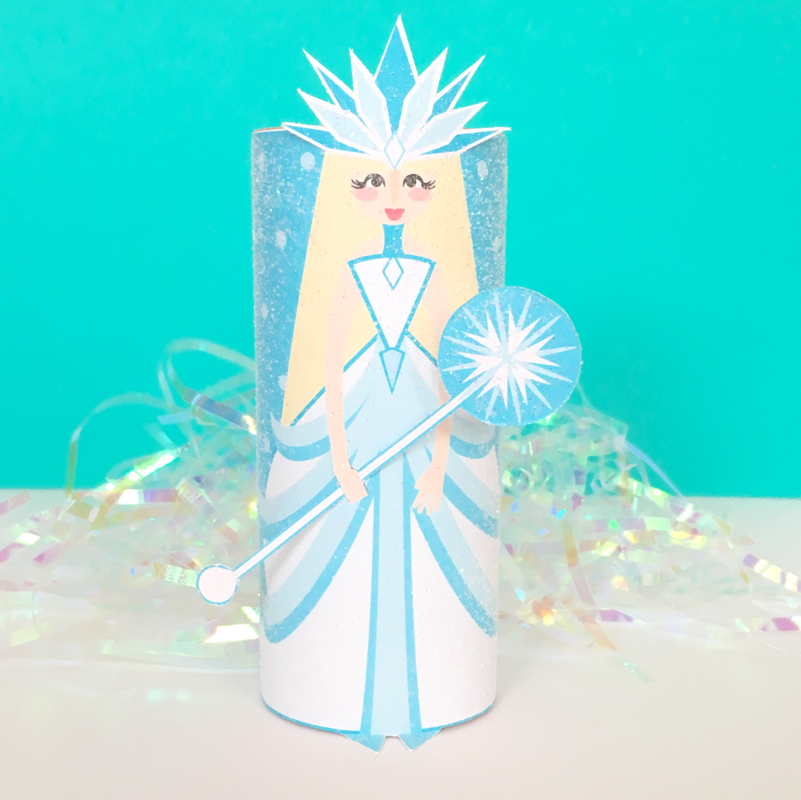
Snow Queen Toilet Tube Craft PrintableEmbrace the winter time if you live in a place where you experience the season, this Snow Queen brings wonder and sparkle, something the other seasons don't offer! Make this toilet tube craft and add your own magic! Is it still bitterly cold where you live? Are you still experiencing winter blizzards? We are here in New York! I've been snuggling up with my blanket and hot coffee, it's the best way to manage the cold, how do you manage such weather conditions? Well we can choose to fight it or we can embrace it as best we can, and this little Snow Queen printable craft will help! 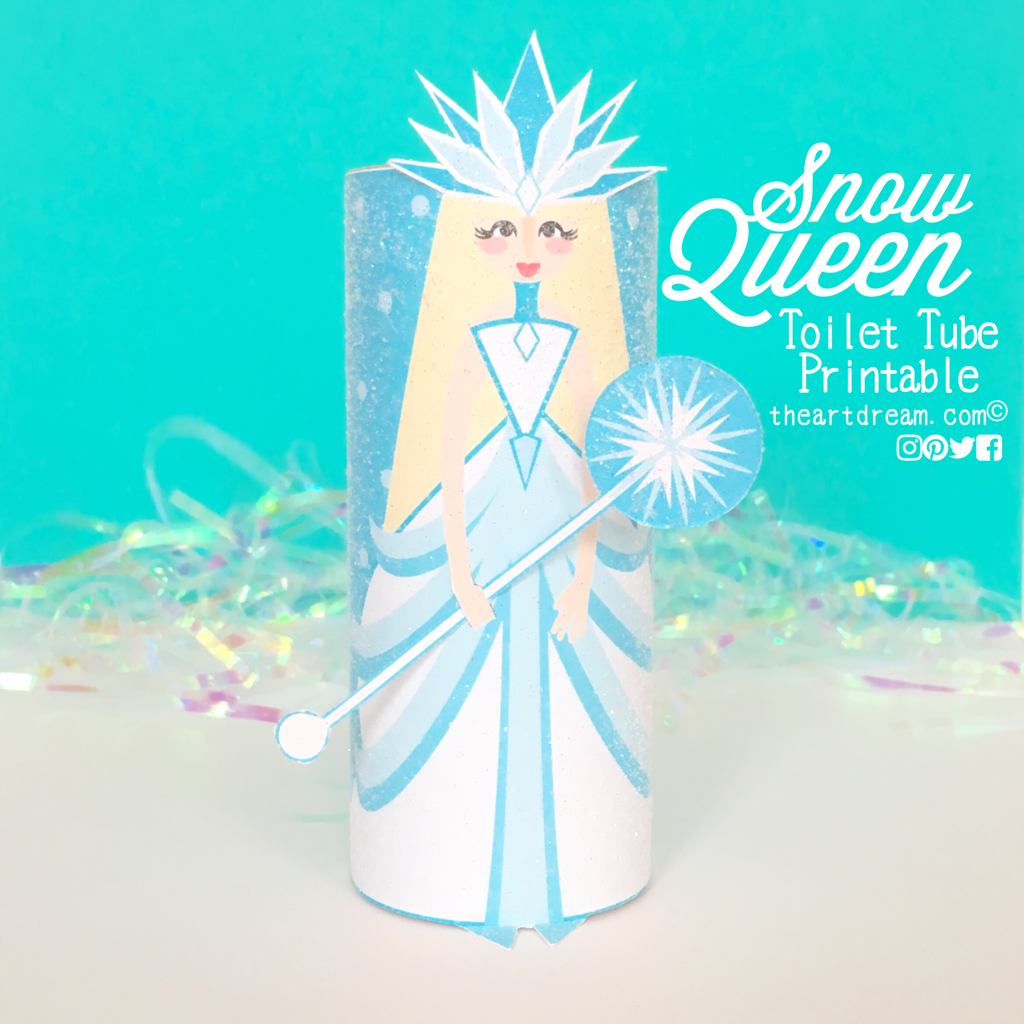 Snow Queen Craft Printable I love the snow actually, and a blizzard makes the day very exciting in my opinion I know a lot will argue haha, I suppose I'll admit that the only thing I don't like about snow is the clean up afterwards. This little Snow Queen is very majestic and proud of what she does, she's regal and poised and ready to take on any challenge. She's simple to make and the kids will have a ton of fun acting out wintry scenes with her. You'll need a toilet tube, and definitely some glitter to make this one! Download it right below!
Materials:
Direction: Step 1. Print out the Snow Queen on white cardstock paper and cut out the shapes with a scissor or craft knife. Step 2. Spray the Snow Queen with spray glue and sprinkle on glitter, allow it to dry. Step 3. Wrap the Snow Queen around a toilet tube and secure with glue, tape or stapler. Step 4. Glue her wand in her hand or you can cut two slits where her hand is to insert the wand. Happy snow day crafting!
Beauty and the Beast Enchanted Rose CraftGet ready for a fantastic transformation this week with the release of Disney's new live action Beauty and the Beast movie. Take the enchantment to your crafting table and transform some ordinary materials into something beautiful and amazing. I'll show you with my tutorial on how to make this enchanted rose from Beauty and the Beast at hellowonderful.co! 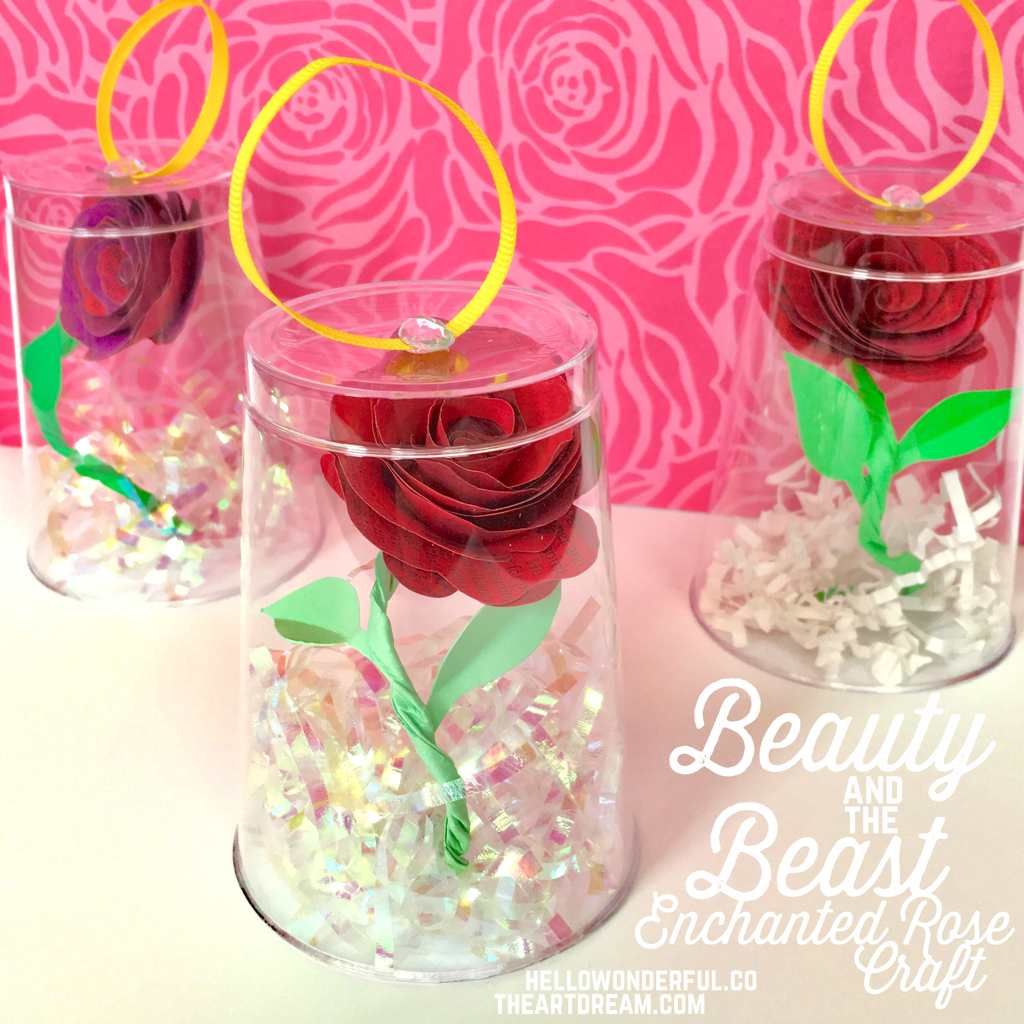 Beauty and the Beast Enchanted Rose Craft The roses here are made from newspaper, yep that's right! The newspaper creates a fantastic texture and varies the use of dark shades to create more depth and visual interest. Plus it pay homage to Belle's love for books. Got an old storybook laying around then paint the pages and use that as the paper for your roses!
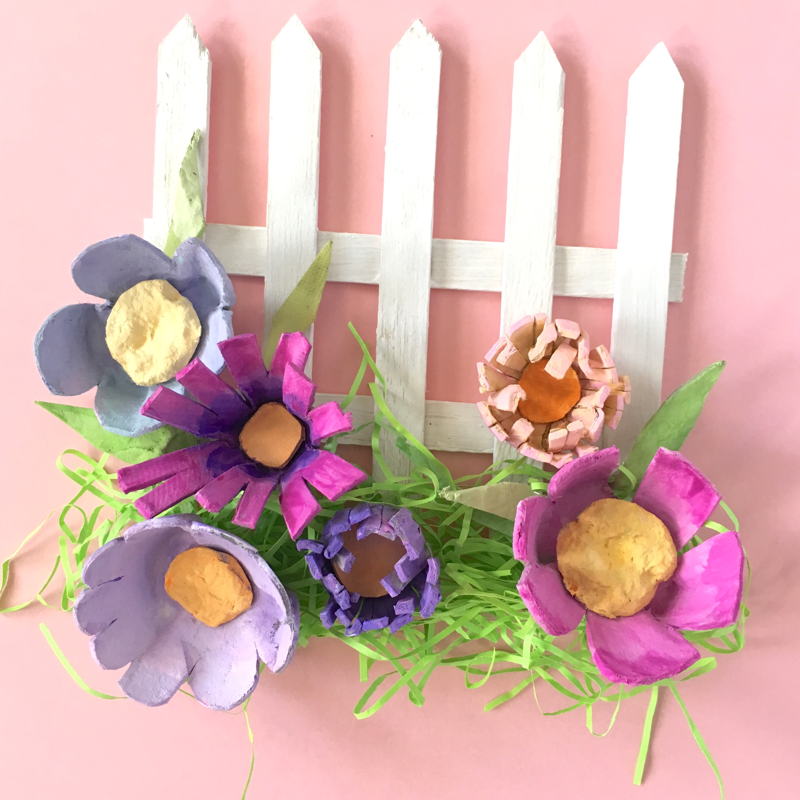
Kids are really going to enjoy the rose nestled under a clear plastic cup, there's just something about it underneath that "glass" which makes it feel special and makes the magic feel so real! Remember to visit hellowonderful.co for more images and a full tutorial on how to make one of your own! Spring Fence with Egg Carton FlowersThis spring craft is like a mini scene of all the things we like to see at the beginning of the spring season. Build a fence from popsicle sticks, add egg carton flowers and you have a charming little display. I typically love a little background added to the crafts I make, after all a setting is just as important as the focal point. A structure such as a fence is a great stepping stone to creating more detailed backgrounds. In the meantime though a picket fence is a nice and easy option for those of us who can't create such elaborate settings. 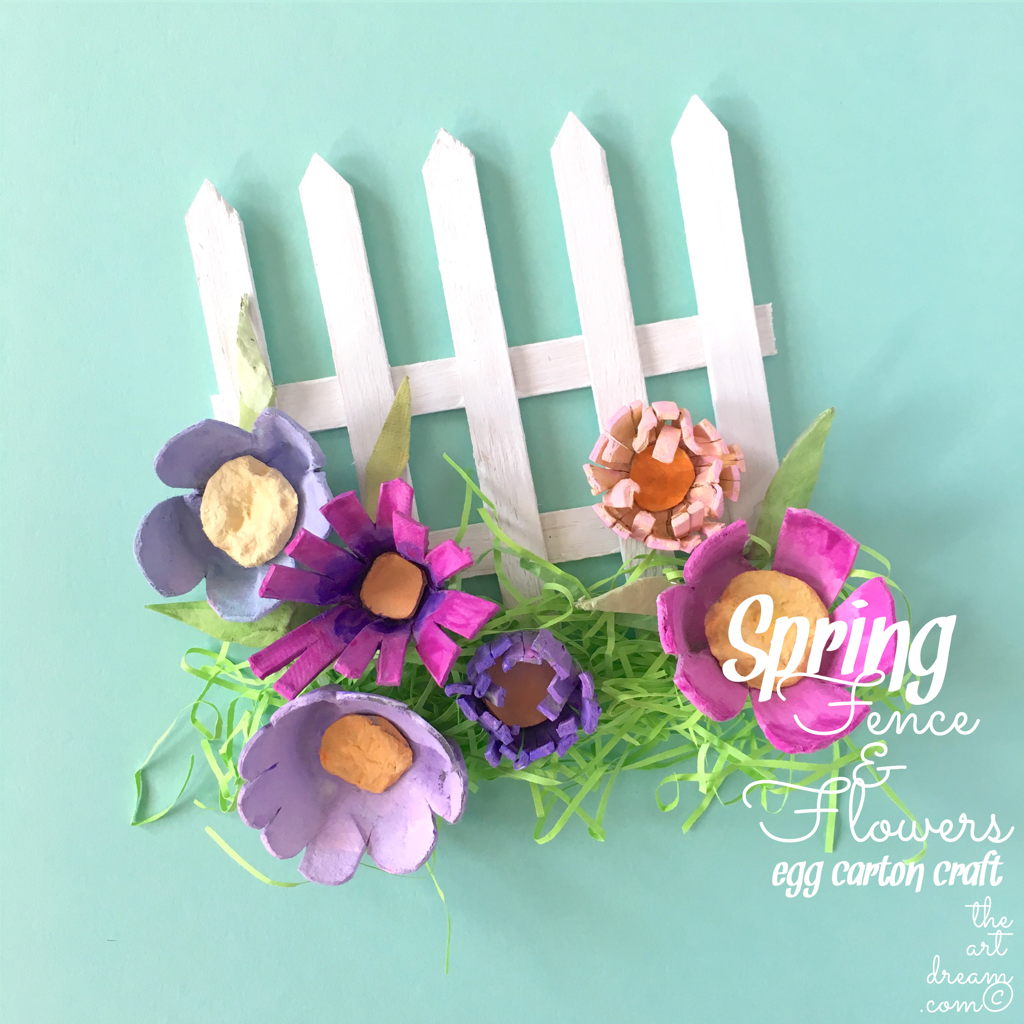 Popsicle Stick Fence & Egg Carton Flowers I also really love how rustic this craft came out. Sometimes I admittedly show a perfectionist quality to my work and it's important to make art for fun and not get so technical about it, sometimes accidents are good and sometimes great things are born from taking a chance and experimenting. Here I cut up an egg carton to make the flowers and I was certainly inspired by the lovely Arielle Goddard at artcampla.com I love her designs and color palettes they are pretty perfect! You can see how the flowers are not perfectly symmetrical, the colors vary and the textures are uneven, this is exactly what you want, a more organic look, which is much more respectable to the beauties of nature! So remember to "just art" don't organize and over rationalize, art is supposed to be unique. Check out my quick tutorial below! Materials:
Directions: Step 1. Hot glue several popsicle sticks together to create your fence. I chose to trim the tops pointy and the bottoms flat. You can do this with a wire cutter or a craft knife, but be careful cutting wood. Step 2. Paint your fence how you'd like. Step 3. Next cut out the cups of the egg carton and shape them into flowers, cut out circular centers as well. Step 4. Paint your flowers and the centers. Step 5. Hot glue shredded grass to the fence then the flowers. You may want to hot glue on magnets to the back and hang this on the fridge. You may also want to hot glue a ribbon on the back for hanging! 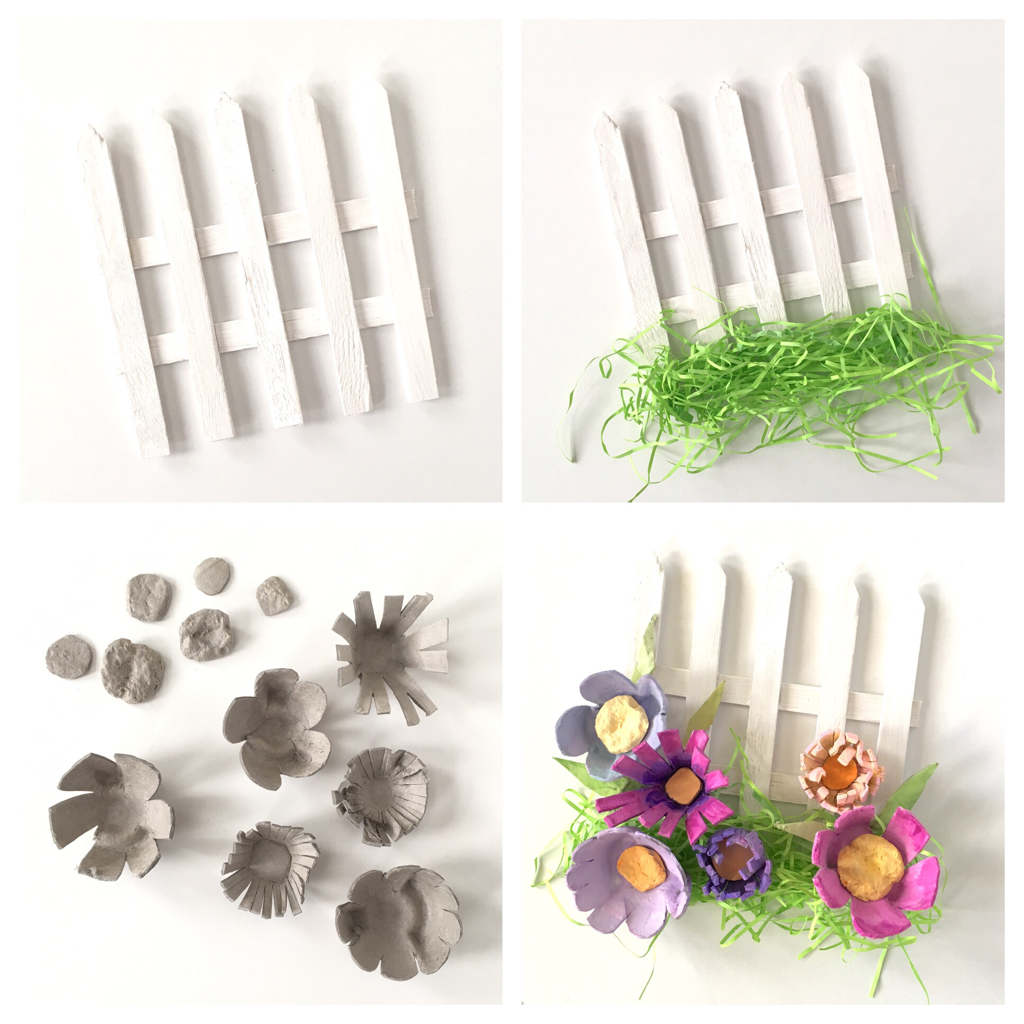 Happy Spring everyone I hope it comes quick for you!
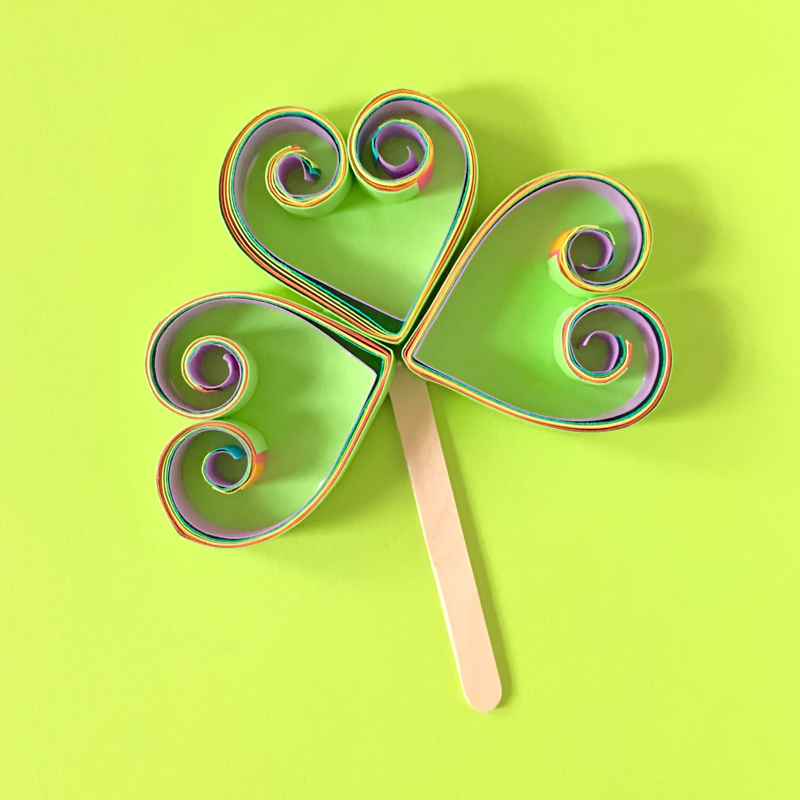
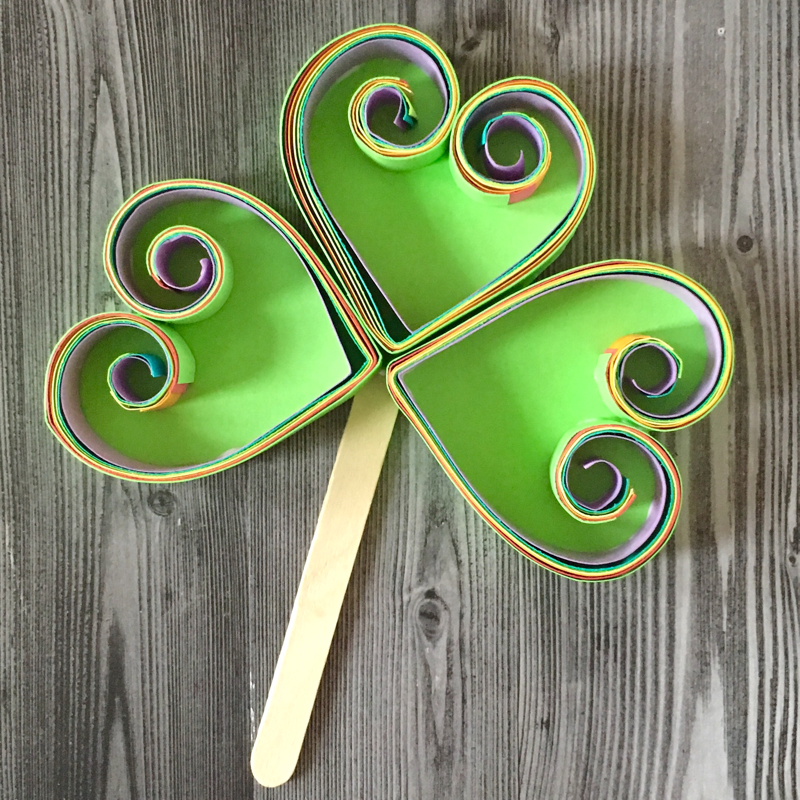
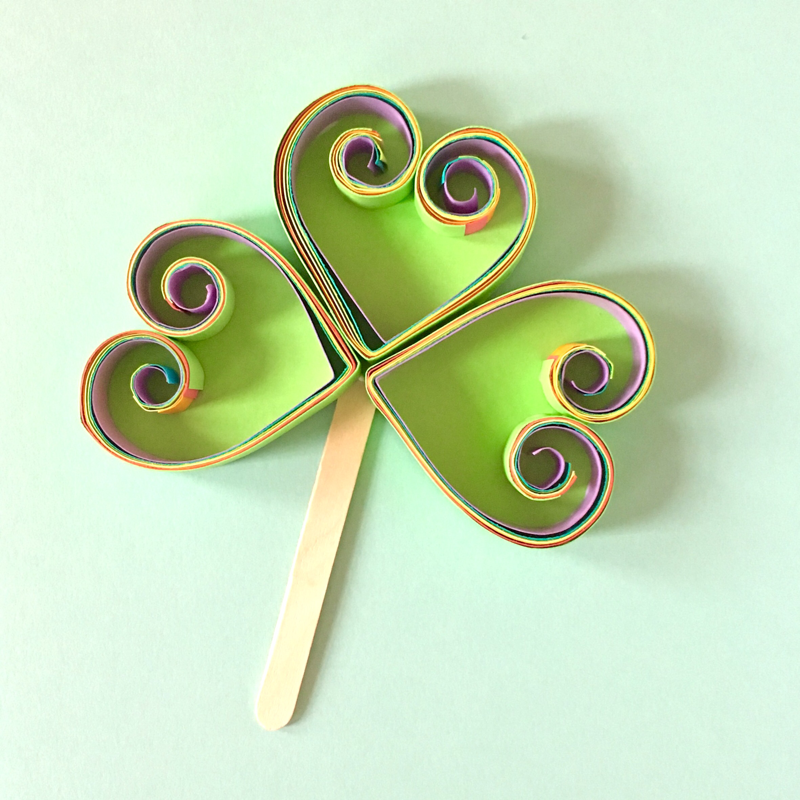
Easy Shamrock Quilling Craft The luck of the Irish is with all of us on St. Patrick's Day, show your Irish side by making a super cool paper quilled shamrock craft! I think paper Quilling is one of the coolest things, and I'll show you a quick and easy way to start your own quilling art with this shamrock craft project. The layers of color make this craft really special, I've incorporated the rainbow here to represent the elements of St. Patrick's Day! 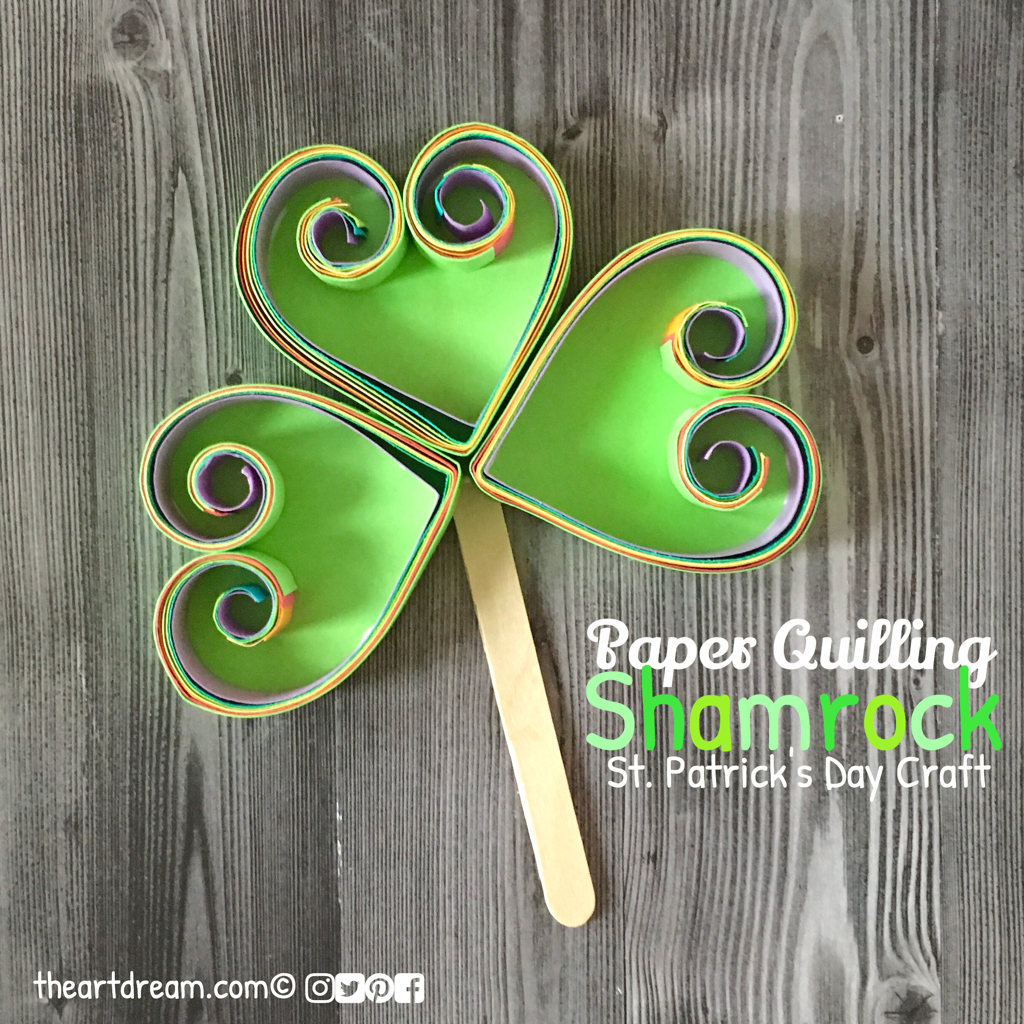 Paper Quilling Shamrock Craft Have you seen some of the fantastic paper quillling art out there?, just do a search and see the amazing things that come up, it's a truly spectacular art form. This shamrock is probably as simple as it gets. Create your own quilling art, you'll be amazed at the results. Materials:
Directions: Step 1. You'll first need to cut long strips of paper about 1/2 an inch wide. I used 11 inch cardstock paper. Cut out three strips per color. Step 2. Next place the strips on top of each other in the order you'd like. I layered 7 strips, this may be too many for beginners, use less strips if you're having difficulty curling the paper. Step 3. Fold the strips in half to find the middle. Then wrap one end around a lollipop stick and begin to curl the strips making your way towards the middle. Roll tightly! 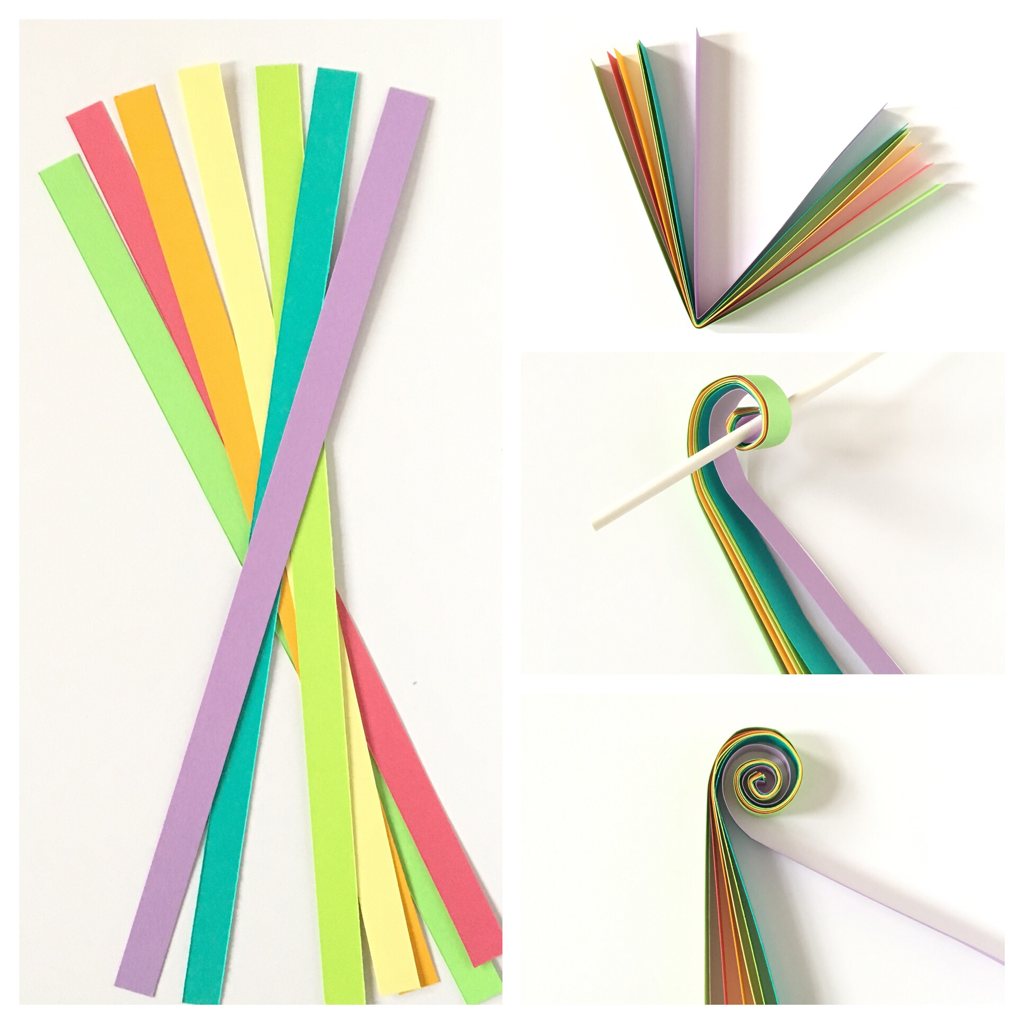 Step 4. Next roll the other end inward towards the middle as well. Step 5. Shape your quilled paper like a heart. Make two more. Step 6. Glue the shapes down to colored cardstock. Dip the heart shapes in glue and press down, let it dry. Step 7. Cut out the shamrock and apply a stem (popsicle stick) to the back.  Happy St. Patrick's Day! Rhino & Sea Otter Paper Plate CraftThe rhino and sea otter are two of many endangered species these days, I thought I'd take some time to learn more about it myself. It's pretty sad to see these animals reduced in numbers especially when it's the result of human activity. I thought it would be great to do a project featuring the rhino and sea otter to shed a little light on the subject. So check out these super cool stylized paper plate animal crafts to share with your kids. Be sure to learn more about the topic yourself, the more we know the more we can educate our children so that they are aware of what's going on in the world around them. Teach them that we share the world with other amazing creatures and they deserve dignity and our respect! Learn more about these guys at hellowonderful.co! 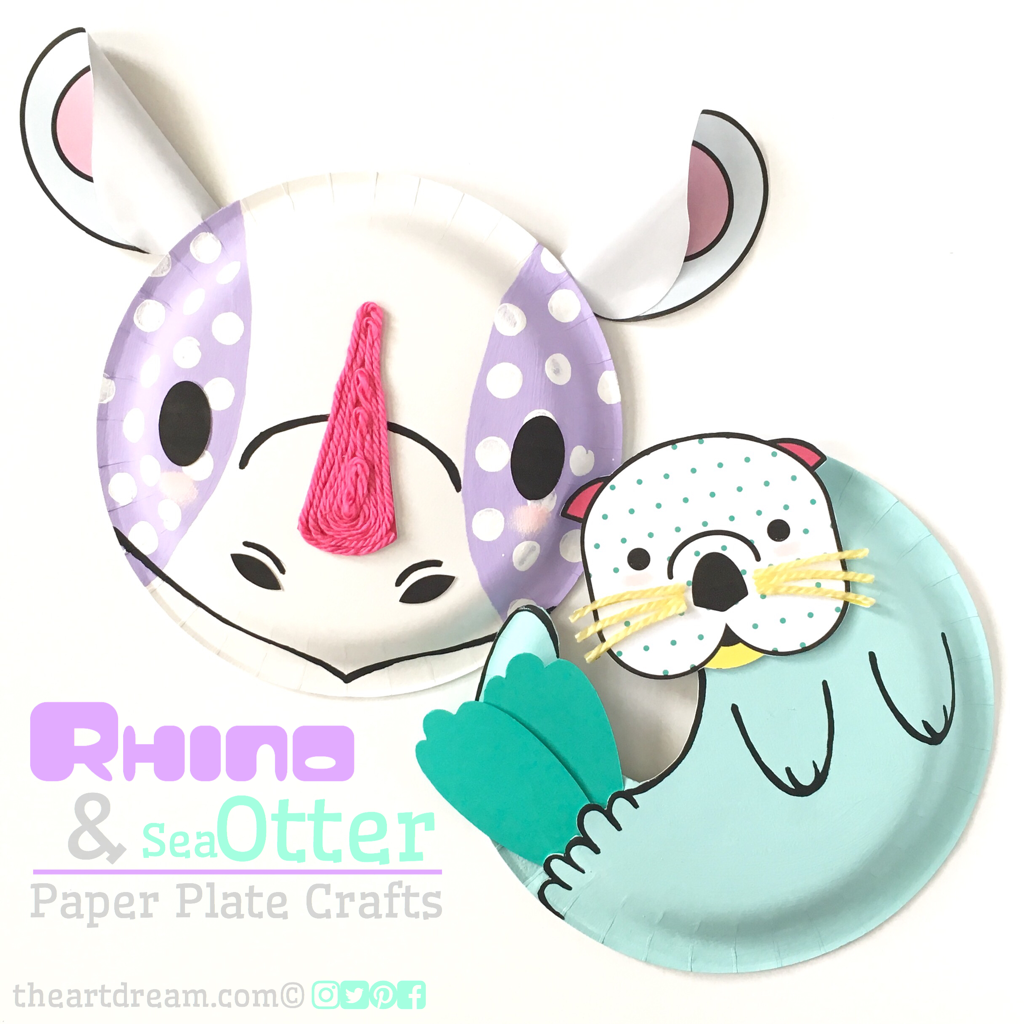 Rhino & Sea Otter Paper Plate Crafts I designed a printable to go along with this craft as well, feel free to model your rhino and sea otter after the printable and use whatever parts of it you'd like. You can even cut out and trace features such as the flippers or horn. See my full tutorial and more photos at hellowonderful.co.
|
AuthorI'm John, an artist and art educator. The Art Dream is here to spark creativity and inspire the little artist inside of you! Archives
October 2021
Categories
Ice Dragon Head Printable
$1.00
Feel the icy breath of this mighty dragon, it’s a dance of fire and ice that’ll leave you in awe. Just add your own streamers to create that blast of blustery snow!
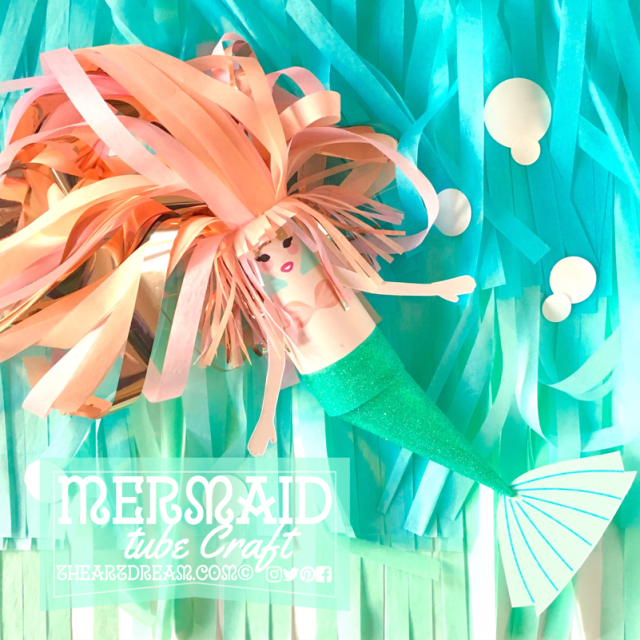
Mermaid Tube Craft Printable
$1.00
Who would dream about the world above the sea when you could dream about the world that is under the sea, where such beautiful creatures like this mermaid must exist! Don't they? I've started your journey of crafting this beautiful sea creature, it's up to you to add magical hair and dress up her fins!
|
||||||||||||


 RSS Feed
Proudly powered by Weebly