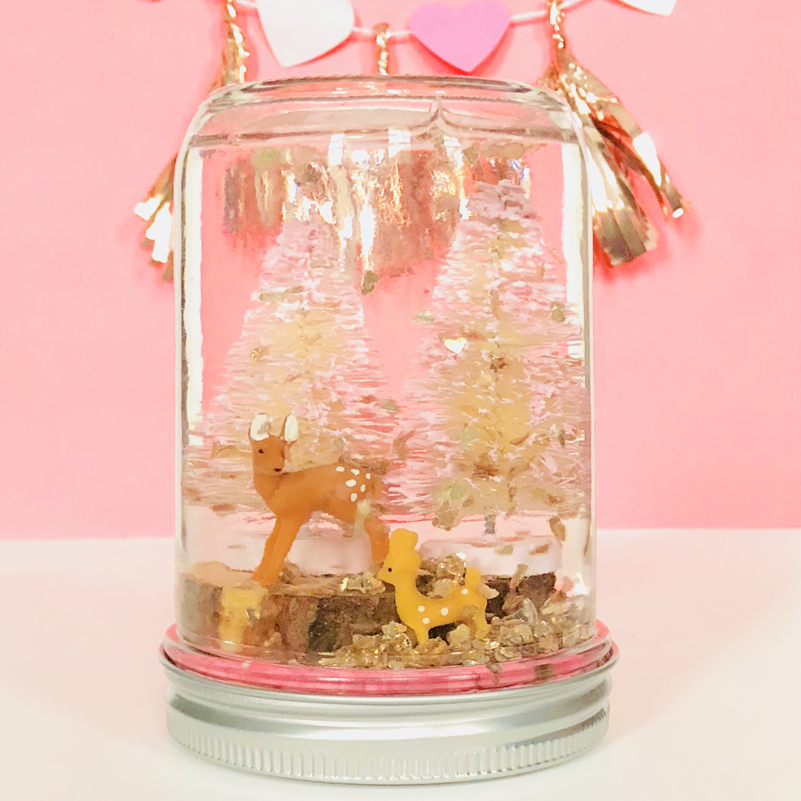
Valentine’s Day Snow GlobeWho says a snow globe is just for winter? Why not make your own magical globe for Valentine’s Day? Use some leftover holiday supplies to make this charming scene! I happened to pick up those mini bottle brush trees and the little plastic deer at the craft store right after Christmas, they were on clearance for only a few dollars so really it was a steal. I figured why not make a snow globe Valentine’s inspired using these materials, and I’m pretty happy about how it came out, it think it’s pretty sweet and would certainly make a nice gift. Kids will also surely love making a snow globe like this too! 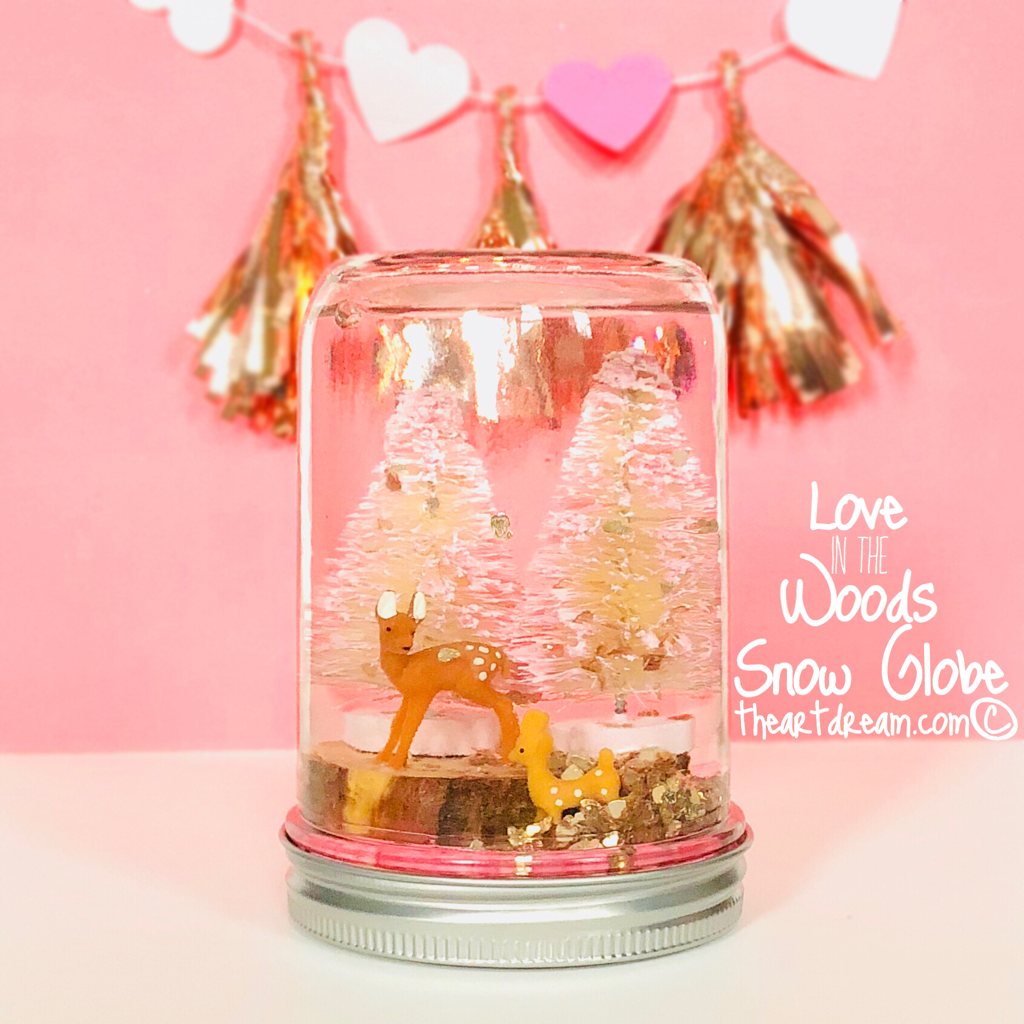 Valentine’s Day Snow Globe I put together a video tutorial for this gem right here at The Art Dream, take a look at it below but first, here’s what you’ll need... Materials:
Directions: Step 1. Paint your bottle brush trees with an all purpose paint. Let them dry really well because you don’t want the wet paint to mix with the water or your snow globe will be ruined. Step 2. Cut a pice of styrofoam to fit the inside lid, paint it and let it dry well also. Step 3. Hot glue the styrofoam to the lid then hot glue on your trees and figurines. Step 4. Fill your jar about 3/4 of the way and add about 2 tablespoons of glycerine and glitter of your choice. Step 5. Place the lid in the jar and add more water if needed!
2 Comments
Mini Felt Flower WreathFelt flowers last so much longer than real ones, plus they show off the everlasting love you have for that special someone! It’s so simple to make a beautiful felt wreath. I partnered with Aleene’s glue on this project, they make a wonderful fabric glue called Fabric Fusion and it holds the felt together incredibly! Fabric Fusion is also a great alternative to hot glue especially when working with young children. I know how frustrating glueing felt could be so definitely check out this glue if you’re looking for something strong to hold your felt projects together! 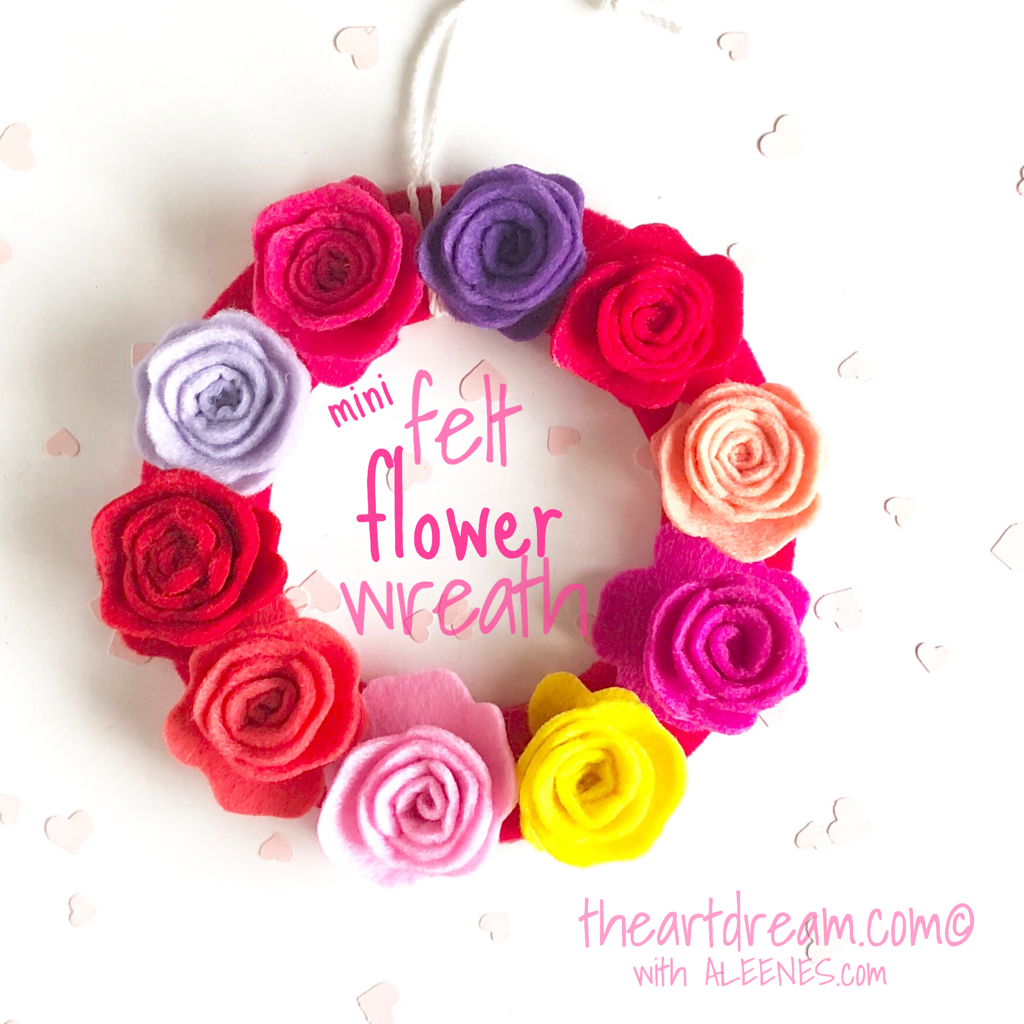 Mini Felt Flower Wreath Using felt to create your Valentine’s Day projects and giveaways is such a great choice because you know they’ll have a little bit (or a lot of bit) haha, more life to them than traditional paper crafts. It’ll be something you can keep around for spring or pull out again year after year for decorating. I especially love felt projects because they hold up better in storage and they won’t break when mishandled. So think about swapping that craft paper for felt once in a while. To see more of this craft visit Aleene’s to get the full video tutorial along with a list of materials! 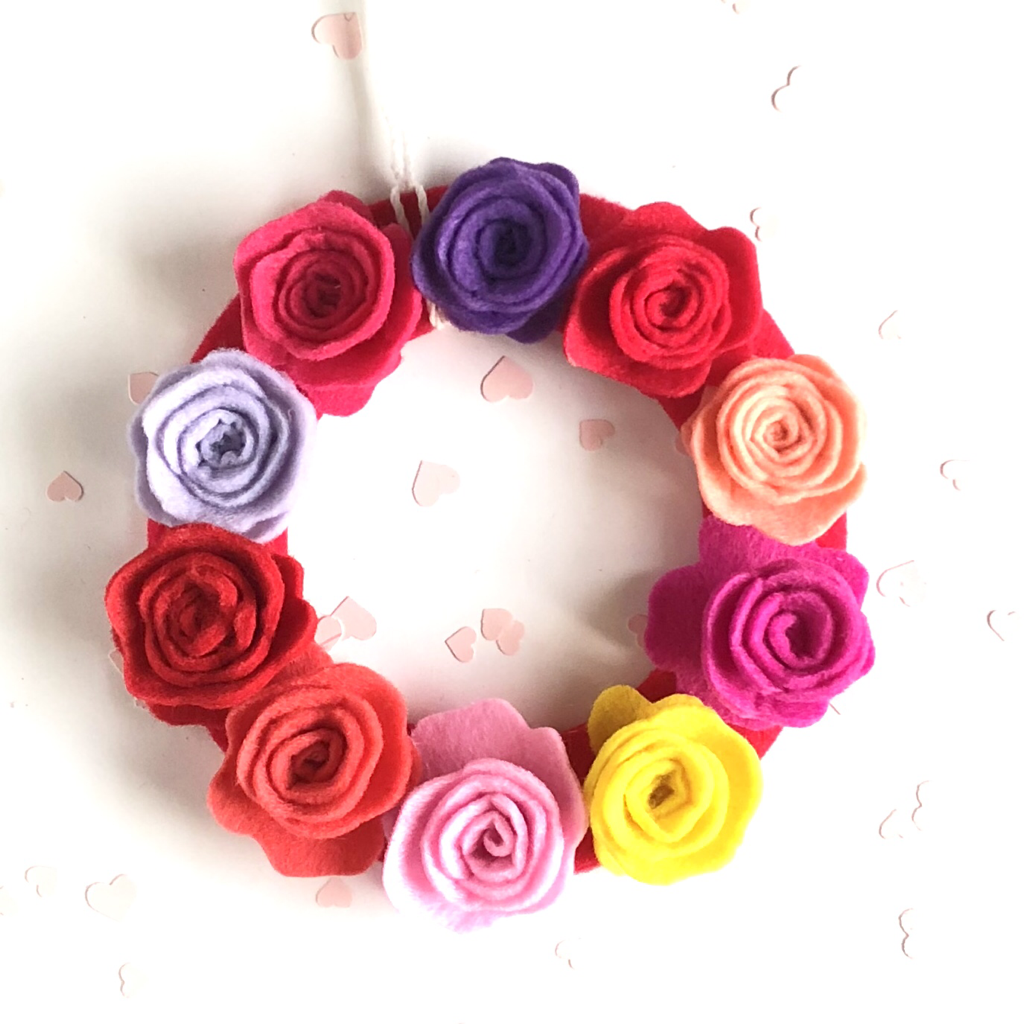 Mini Felt Flower Wreath Puffy Heart Printable CraftPuff, puff these hearts beat right off the page. I make it easy for you and the kids to make the most lovable hearts for Valentine’s Day! Just print, cut and fold these easy 3D hearts! It can’t really get much more fun than this, you’ll get two different sized hearts with this free printable to make your own Valentine’s for giving out this year! 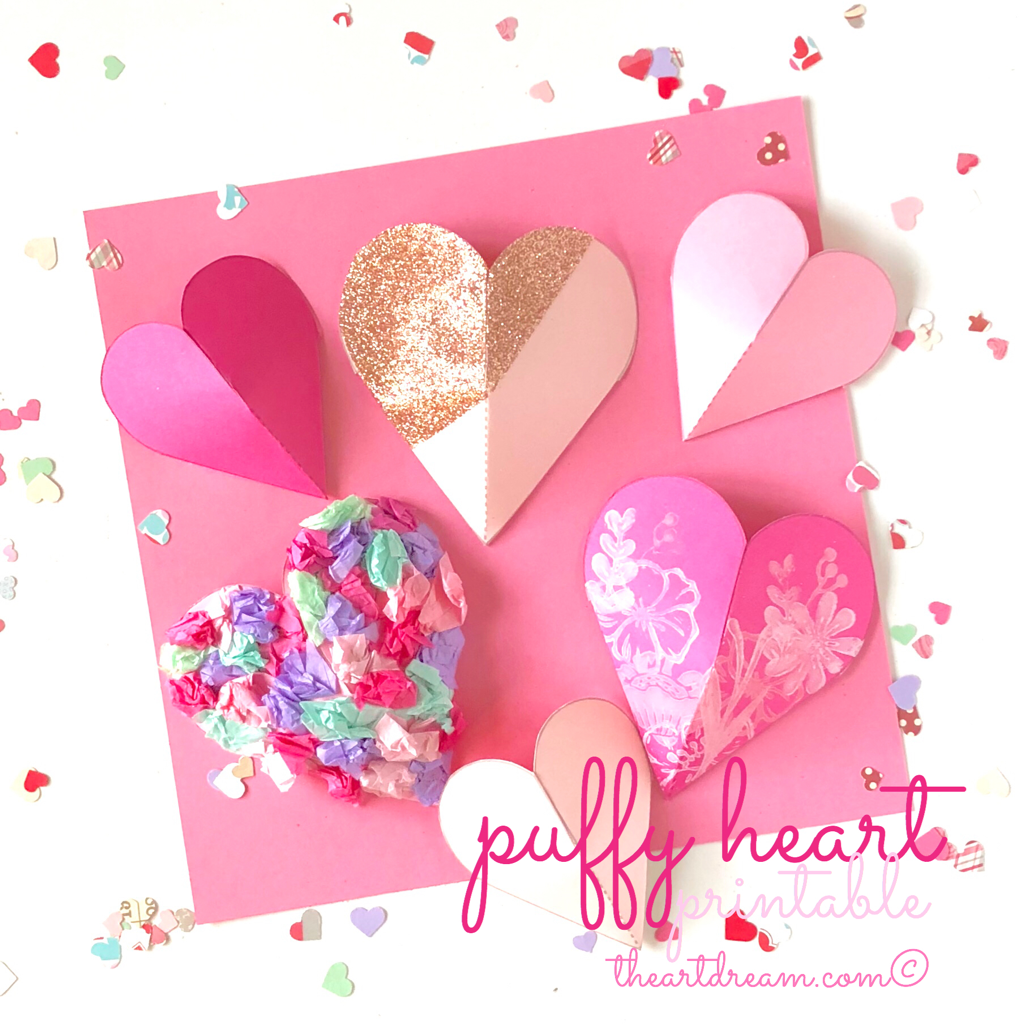 Puffy Heart Printable The possibilities are endless with this cute little template, make cards or mailboxes, glue them to gift bags or mount them in a shadow box for a quick Valentine’s Day decoration. Just download the free printable below and get started on blowing someone’s mind or melting their heart! Be sure to take a look at my quick video tutorial as well! Hope you guys have fun! Can’t wait to see all of the wonderful things you come up with! If you like this printable be sure to check out more of my original designs in the shop!
Materials:
Directions: Step 1. Print out the template on colored cardstock. 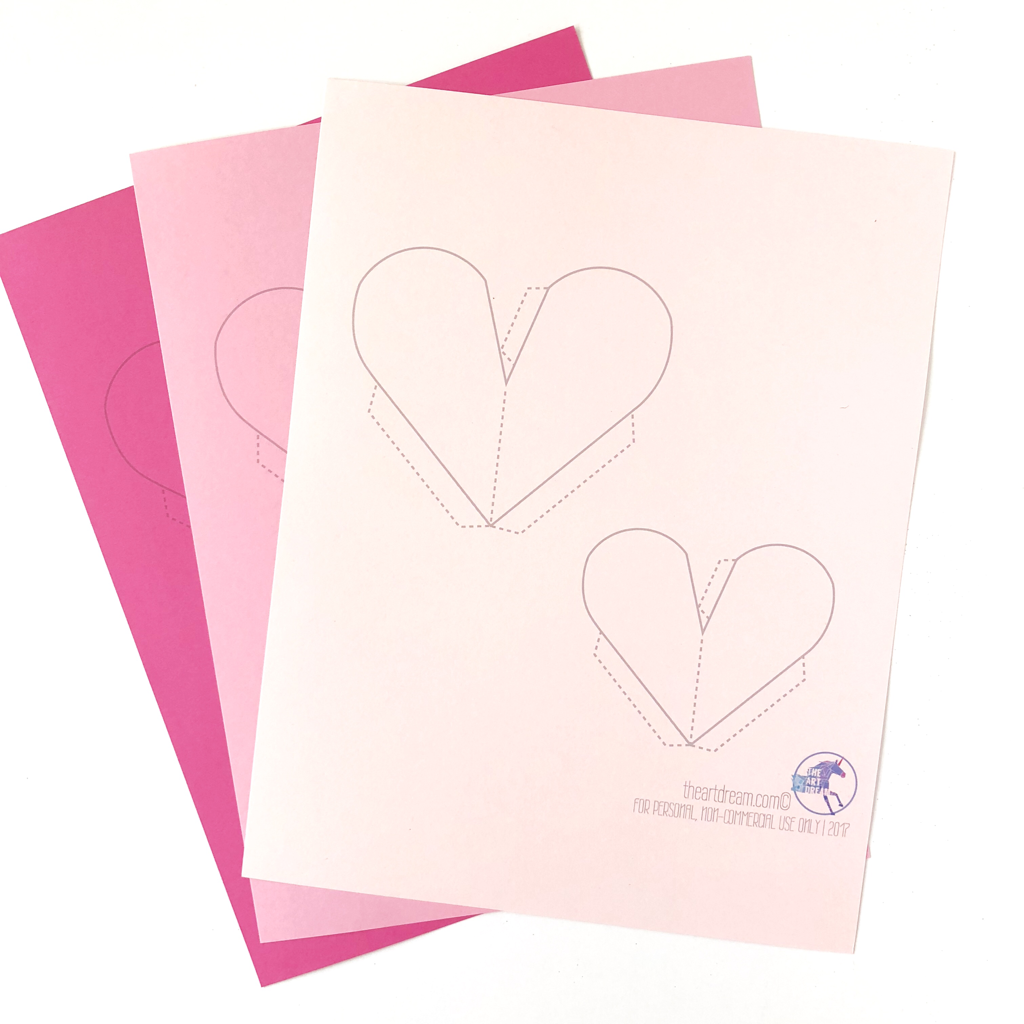 Step 2. Cut the hearts out with a scissor or craft knife, be sure to leave all of the flaps intact.  Step 3. Decorate your hearts as you wish, add glitter, crumpled tissue paper or even stamps on your hearts. 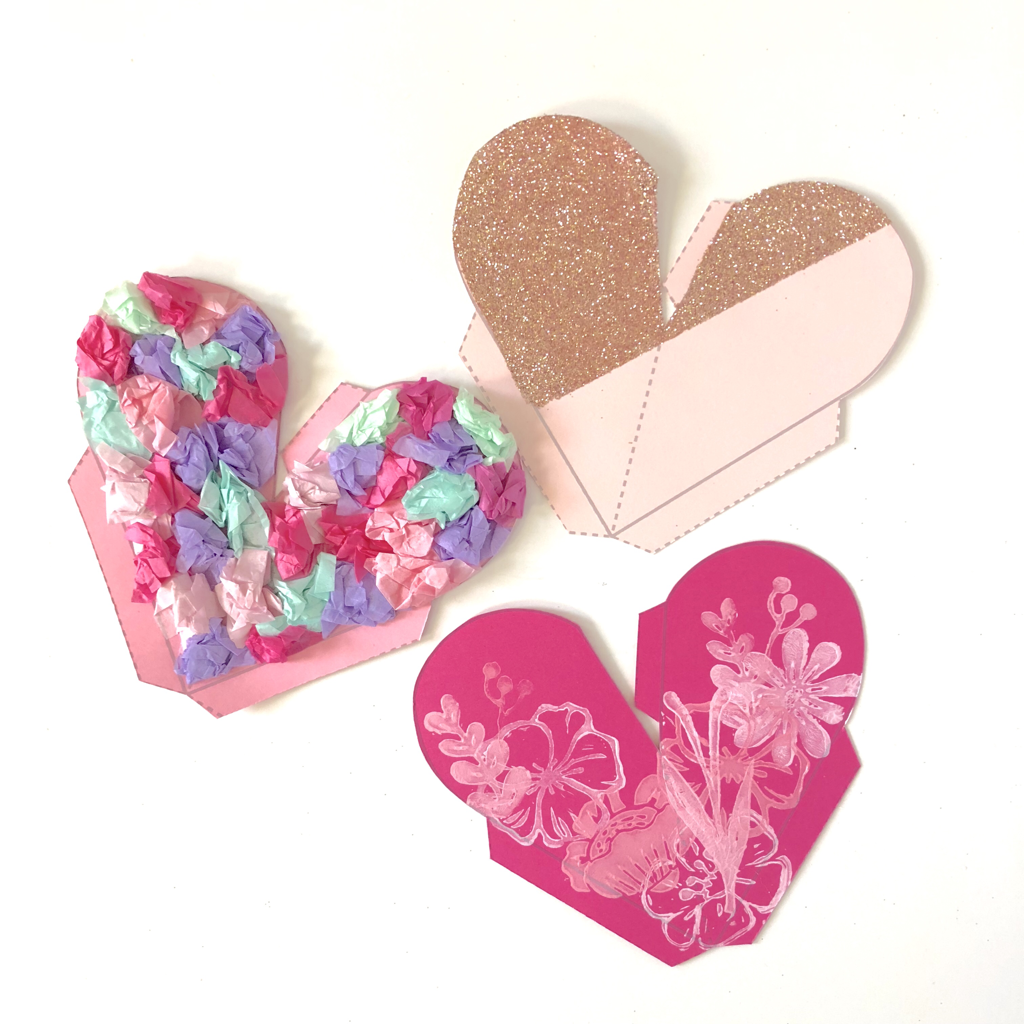 Step 4. Fold the flaps back and fold the center. Glue the smallest flap to its corresponding side to close the heart.
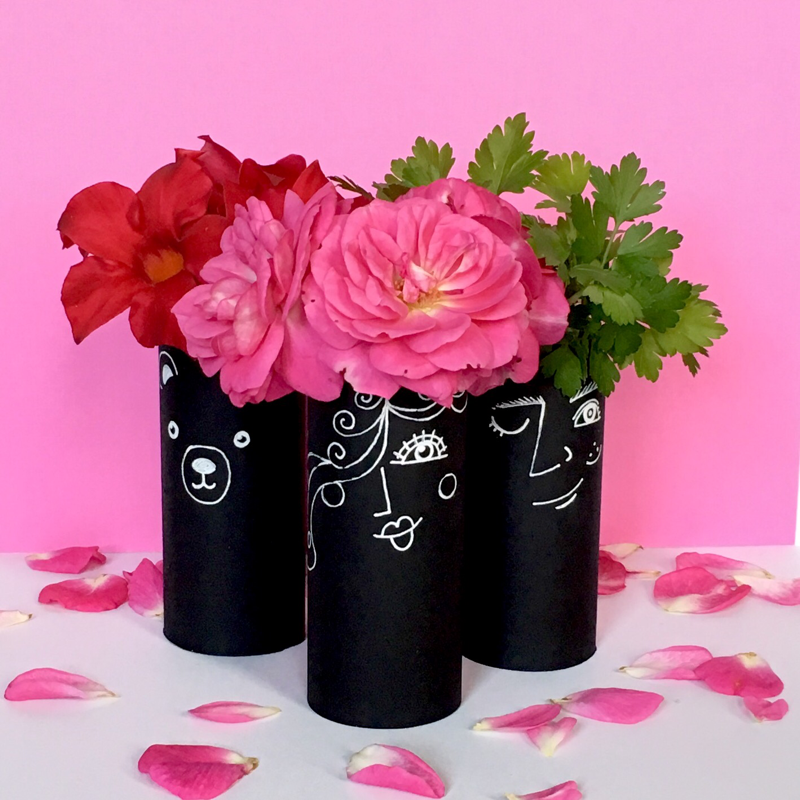
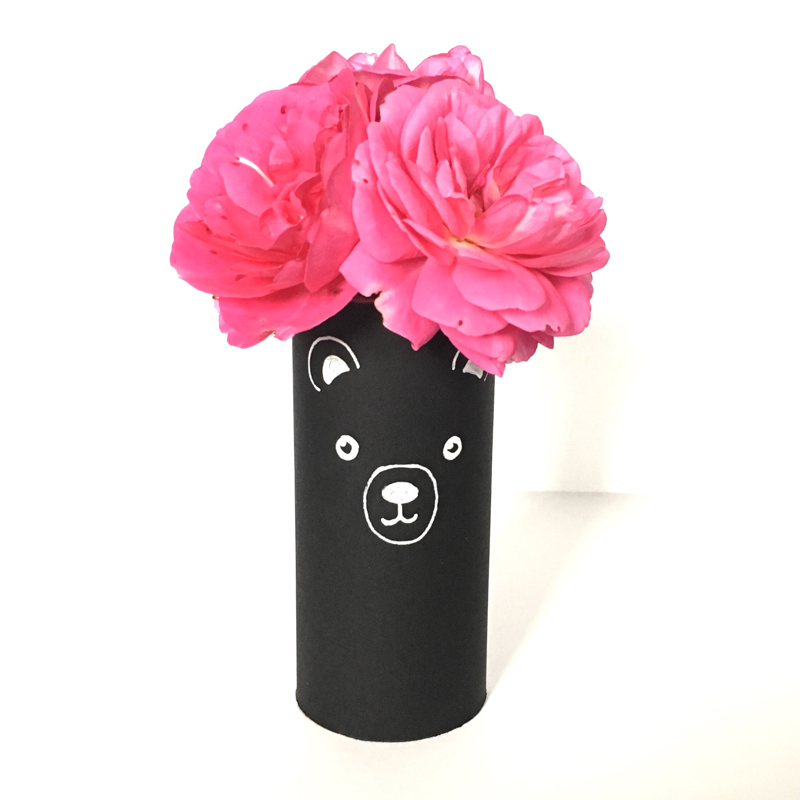
Step 5. Use the bigger flaps to glue down to your paper or background. Tube Craft Characters with Flower TopsUse some fresh flowers this season to warm up those winter blues! Flower top character planters are the perfect little companions for little kids and adults too! These guys also make great Valentine’s day giveaways. I teamed up with OOLY.com to bring you these fun flower heads, just check it out for yourself. There are so many possibilities with this fun and easy craft, use all different kinds of flowers to create a mini floral arrangement perfect to give to that special Valentine! 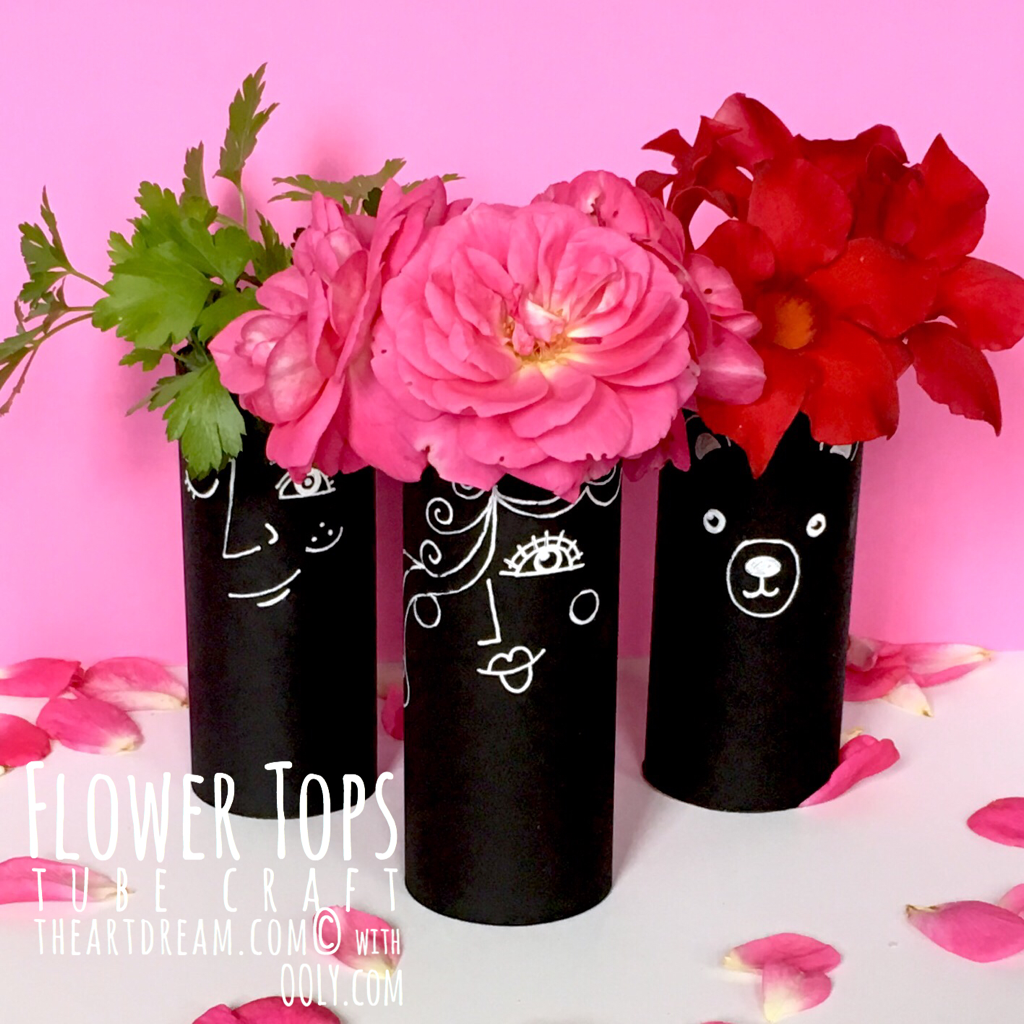 Flower Tube Craft Planters Visit OOLY.com to find a tutorial on how I’ve made these flower top characters, I even used a piece of wet floral foam inside to keep the flowers fresh for a bit. I also love the white gel marker on black paper look, it gives this craft that vintage feeling! 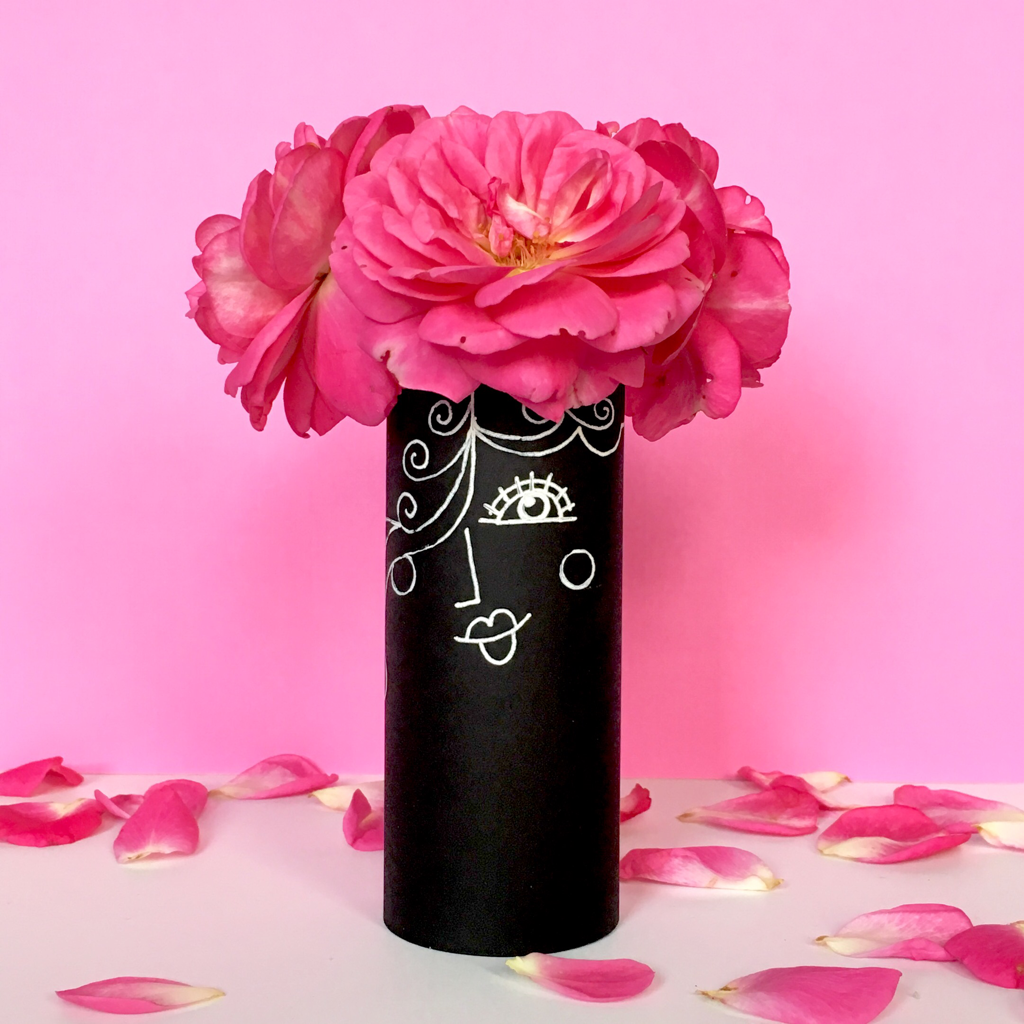 “Madame Rosè” Try all different kinds of flowers with all different kinds of funny faces! I bet the kids can come up with some fantastic things! Tissue Paper Collage ProjectMaking a tissue paper collage is a must do project, it’s fun, easy and always comes out beautiful! Check out two holiday illustrations I made using the bleeding tissue paper technique. There’s just something magical about the way the colors naturally blend after getting wet, the results are truly amazing, you’re not going to want to stop staring at the finished works of art. This technique can be done as simple or as intricate as you’d like, either way you’ll want to make this project over and over again. The angel below is quite special too, she’s an example of making art projects a little more meaningful. I payed attention to the colors I chose, the look on her face and the flag she’s holding, all represent something to me. So be sure to create art with intention, it makes it that much more interesting when there’s a beautiful story to be told. 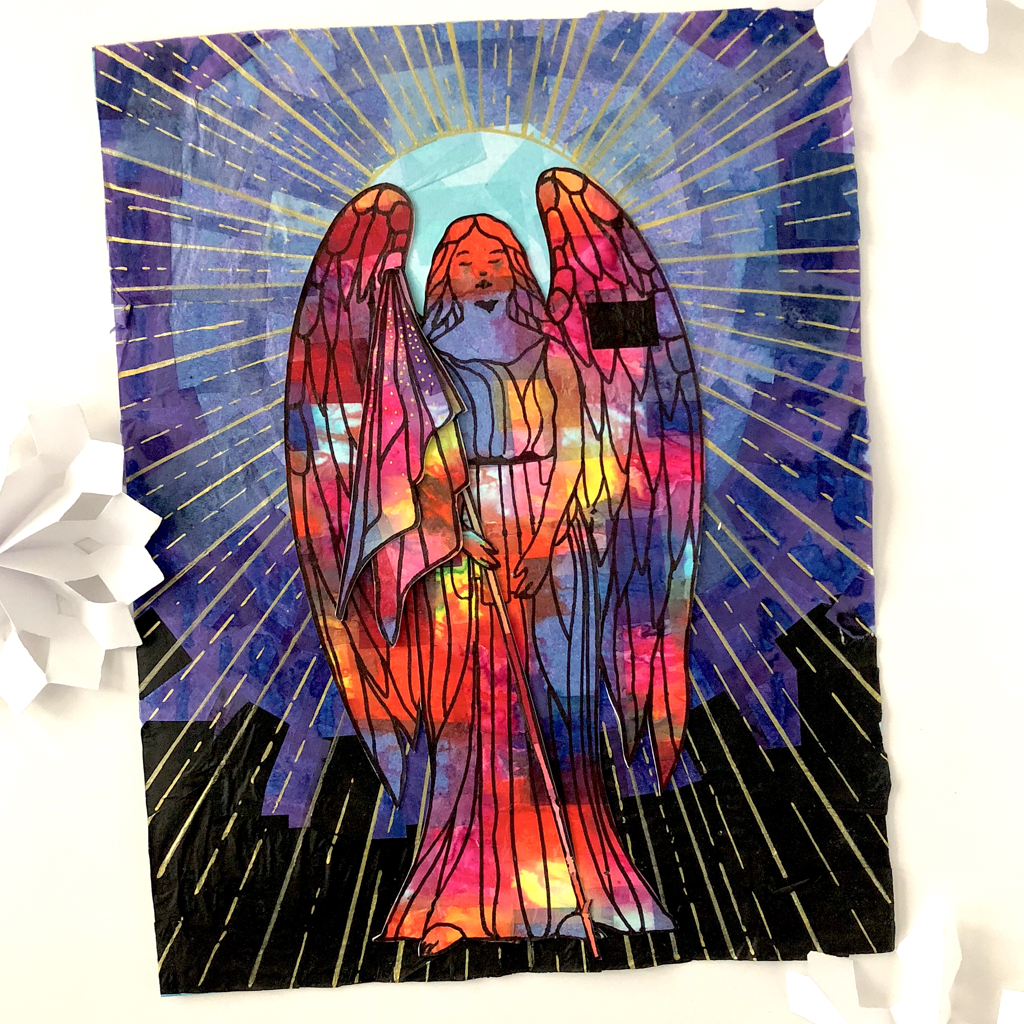 Angel Tissue Paper Collage So I didn’t put together a step by step photo tutorial about how I made this but it’s simple enough for me to explain in words, so here’s a short tutorial if you’d like to know the details. Materials:
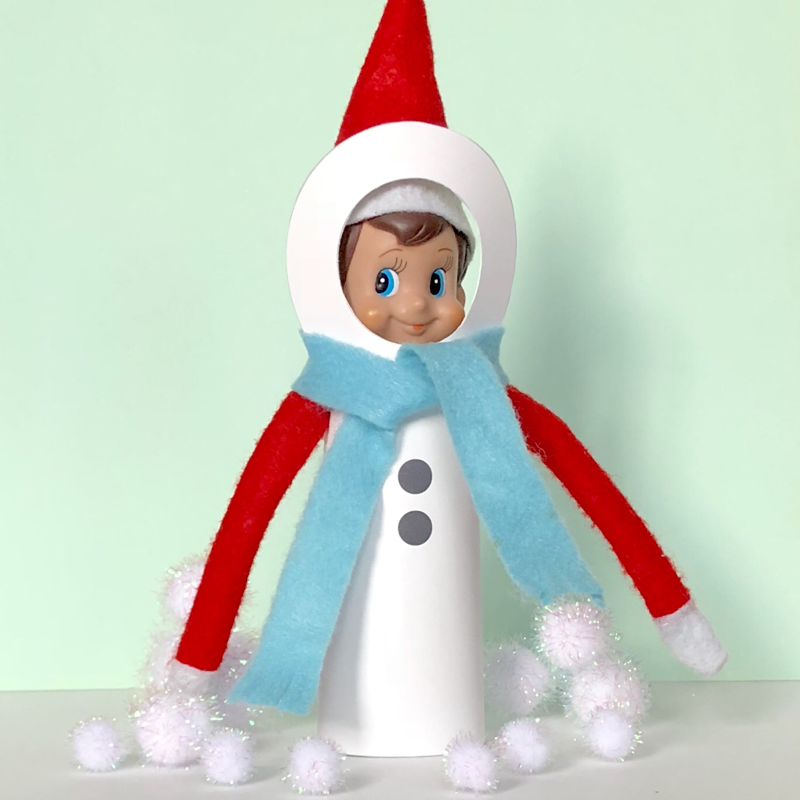
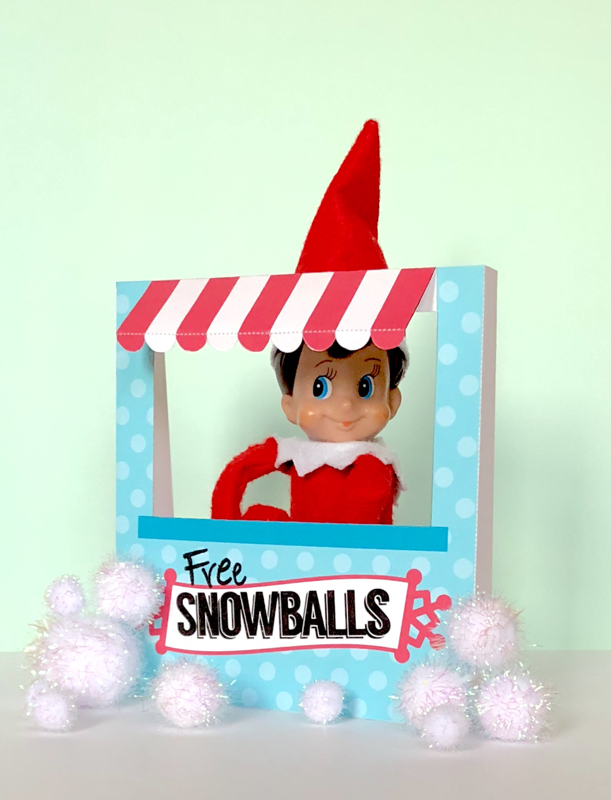
Directions: Step 1. Cut up several colors of bleeding tissue paper into small squares, the size does not have to be exact. Step 2. Start with a strong piece of paper like a 110lb cardstock or a watercolor paper and glue the tissue paper squares to the entire sheet overlapping a bit as you go along. Make several of these, one to cut up and one to use as a background. Step 3. Spritz the paper with a spray bottle until the color starts to run and blend. Let the papers dry overnight. Step 4. Use your paper to cut out different shapes such as trees, then glue them to your background. Add finishing touches with sharpies or other materials. You can even splatter some paint to create a snowy effect. 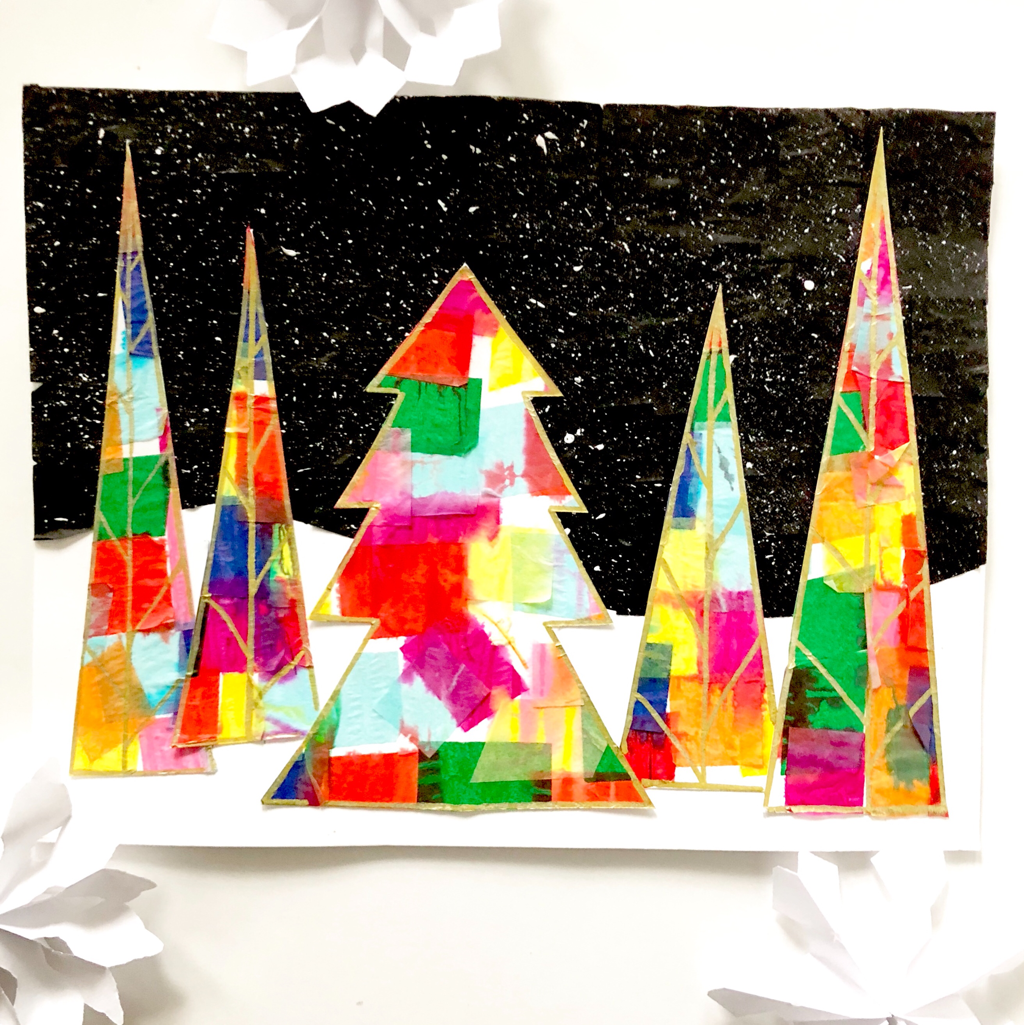 Winter Scene Tissue Paper Collage Snowman Toilet Tube CraftHave you seen these toilet tube snowman crafts? They are the epitome of winter, it just wouldn’t be the same without seeing a snowman on the lawns of homes around town. But these guys are fit to build inside. It’s shape is simple and easy and you only need a few materials to bring this frosty to life. We just got our first snowfall here in New York, and instead of going out in the cold to make a real snowman I decided to make this guy instead, how fitting! This craft is also created with Aleene’s Tacky glue and you can catch the full tutorial at Aleenes.com! 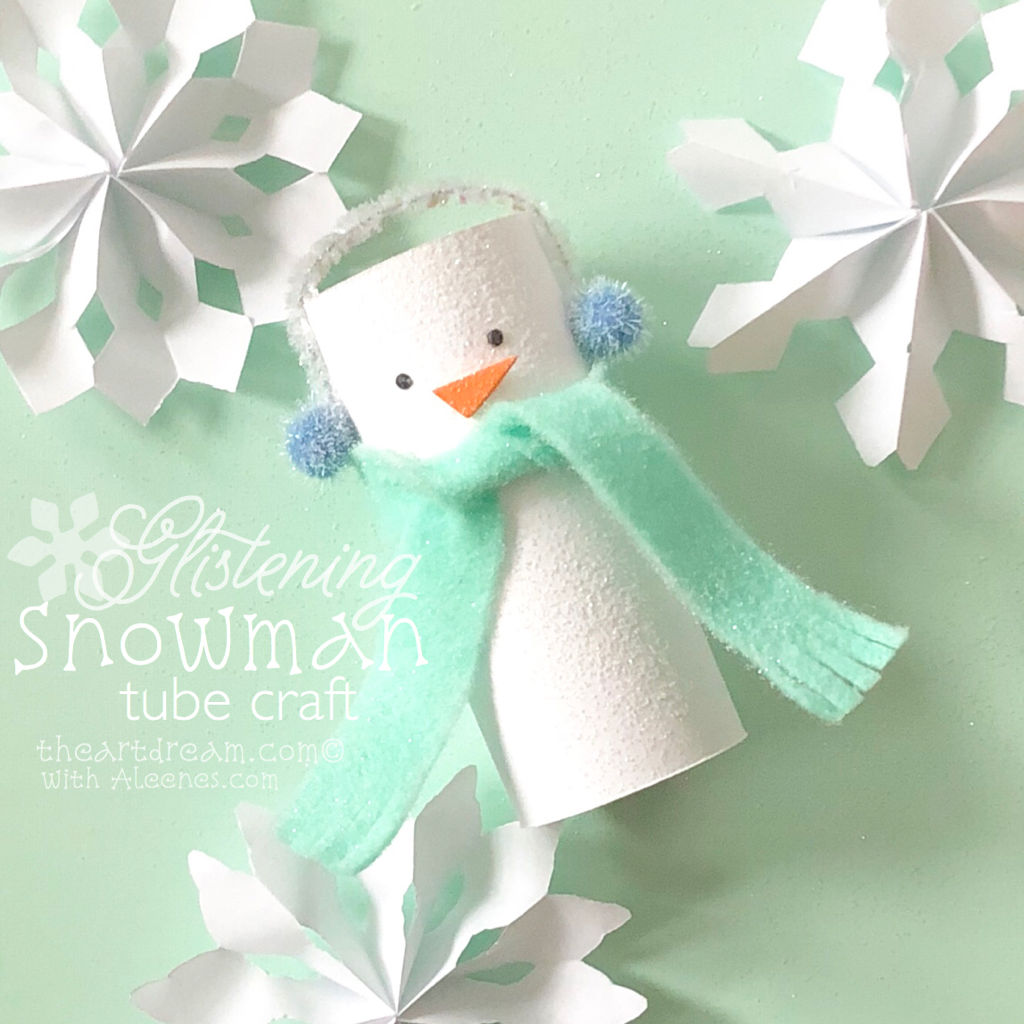 Snowman Toilet Tube Craft I had done this project a few years back with my special needs students, and when you see these snowmen in numbers it creates a festive scene, kinda reminds me of the whole family together for the holidays. Can you just imagine these snowmen with different scarves and earmuffs, it’ll look like they’re ready for the company Christmas party or to weather a trip to the North Pole! You’ll also want to definitely get some iridescent glitter on them, it’ll make ‘em look like they were made out of freshly fallen snow! Remember to visit Aleenes.com for a full video tutorial to make these guys! 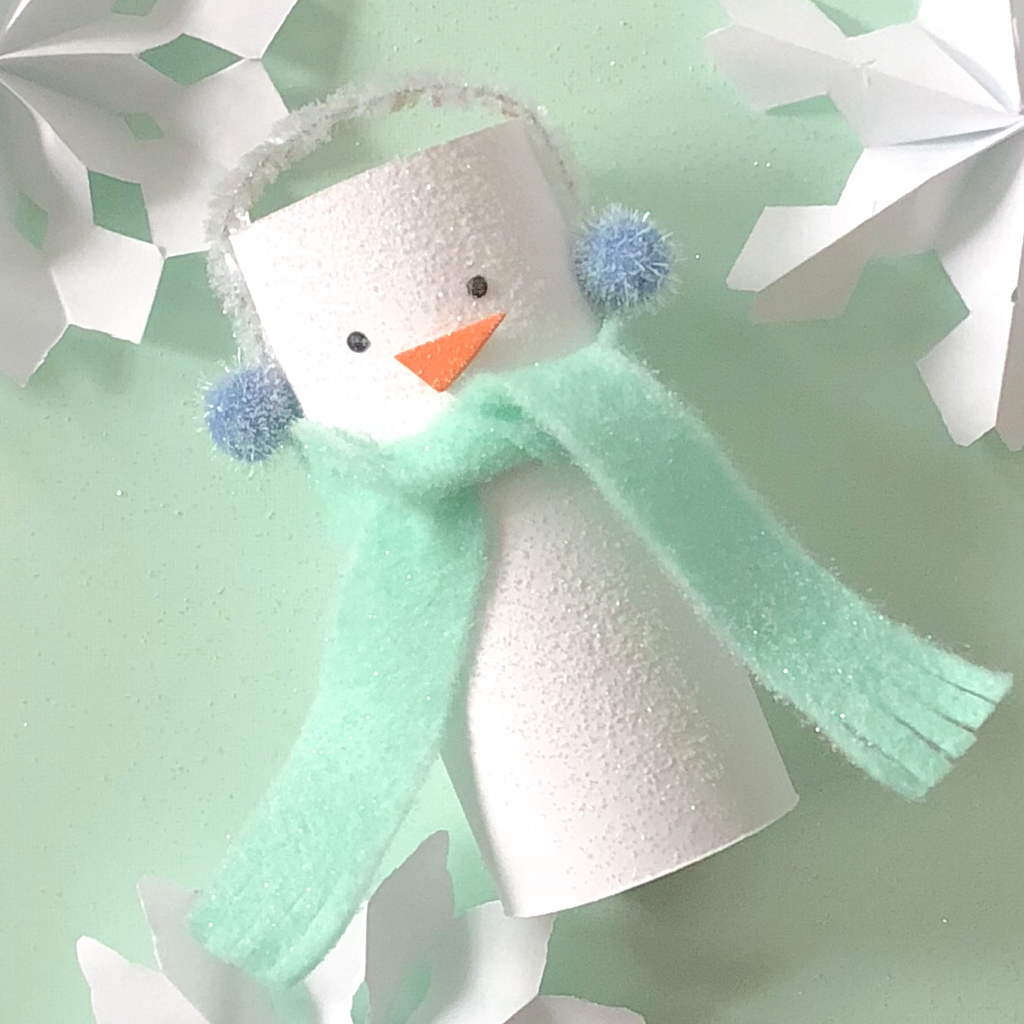 Snowman Toilet Tube Craft Winter Tree CraftWinter can be a challenge, but look past the obstacles and find the beauty in the cold. Create a whimsical winter look with cone cups and wood slices! Even though this looks like a sophisticated craft it’s really not, it’s a simple and fun project the whole family can get involved with during the holiday season. The craft store sells all sorts of wooden products which is great for creating that organic natural look when making something like trees. 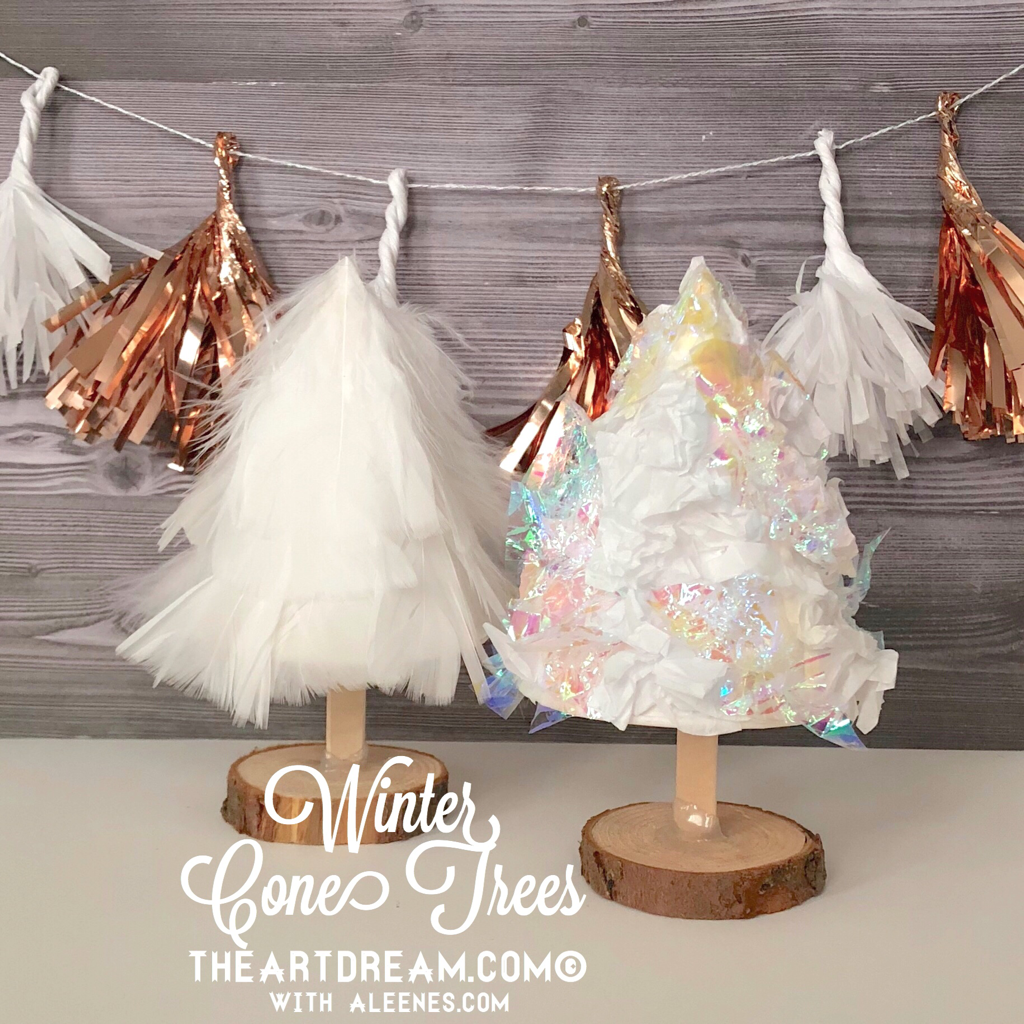 Winter Trees I worked with Aleene’s glue on this project, their tacky glue is strong enough to hold some tougher materials like the plasticky iridescent paper I used for the tissue paper tree. Sometimes you use a tricky stubborn material but with Aleene’s Tacky glue, you won’t have a problem. Anyway winter is here, no Game of Thrones pun intended, and you might as well embrace it by making some frosty fantastic projects. Follow the link here to see a full video tutorial for putting this craft together, you’ll also find a full materials list as well. I hope you enjoy making this craft as much as I do, remember to put your own creative spin on these trees and I’m sure you’ll be putting these out for the holidays every year! Elf on a Shelf PrintablesMeet Jasper Jingleberry he’s my classroom Elf on a Shelf and he’s here to present to you some nifty printables from the North Pole! Jasper Jingleberry is back for 2017 sporting some sweet treats for your house elf experience. Have you gotten in too deep with this whole Elf on a Shelf fiasco? I know the kids love it but it sure can be a hassle for some parents and family members to put together a new and unique experience each time your elf performs a mischievous act. Well I’ve created some fun paper crafts to help you out, they are sure to wow your little ones this holiday season! If you’re liking what Jasper Jingleberry made here then download it in my shop for instant elvish fun! 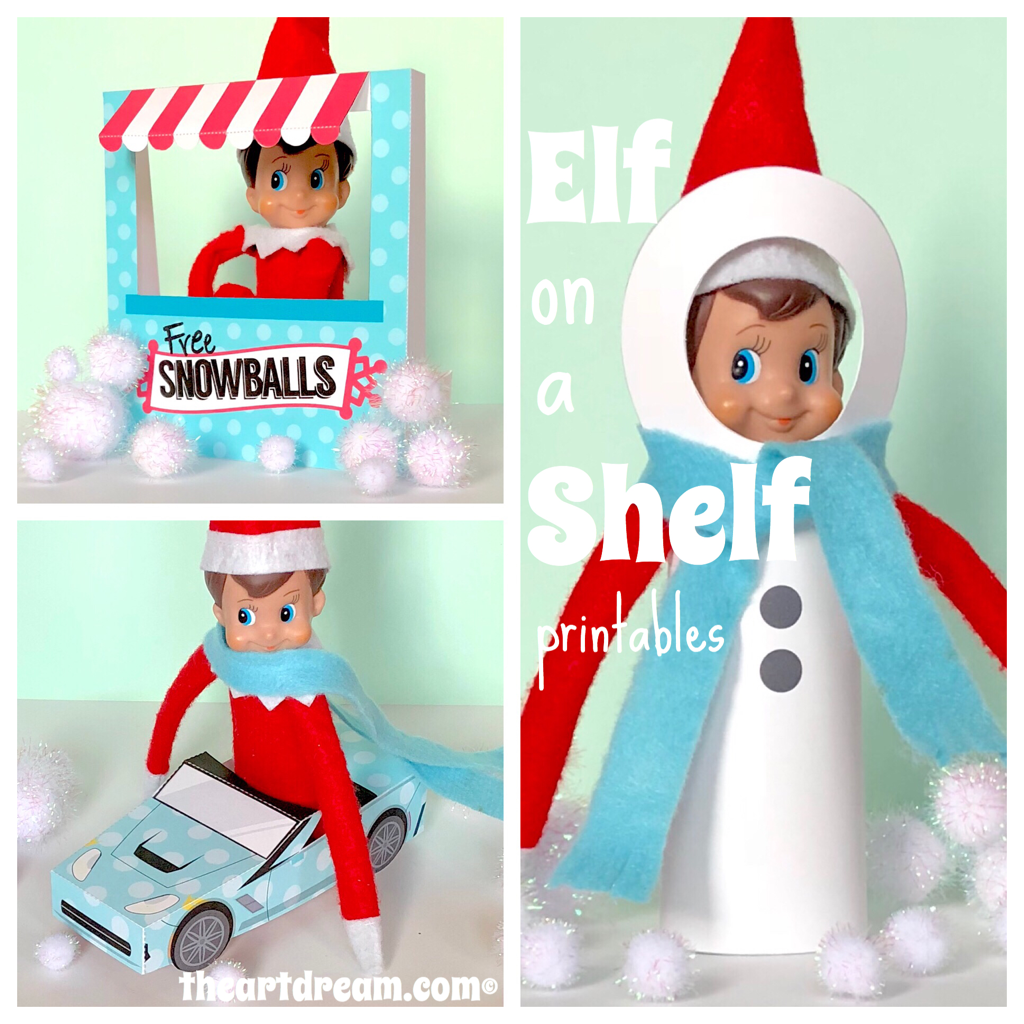 Elf on a Shelf Printables Here I have for you three fun papercrafts to get you started on creating some fun family moments. The kids will be amazed at how well their elf can manage to surprise his onlookers. First you’ll notice the elf giving away free snowballs, what a kind thing to do. I guess he’s gone through the trouble of shaping those snowballs for you haha! Create a lovely scene with pom-poms to get the snowball fight going. Then we have the elf riding around in his cool convertible toy car, he must have borrowed this ride from Santa! Lastly elf is all dressed up in his snowman attire, I think he wants to be a part of that family of snowpeople outside on the front lawn! If you’d like to make these be sure to visit the shop to find the Elf on a Shelf printables! If you are having trouble with the printed size of the image, make sure that you select "fit to page" or "print actual size" in your printer options window. Materials:
Directions: Step 1. Be sure to cut out all of the shapes with a scissor or craft knife. Step 2. For the snowball stand. Score on all of the dotted lines, cut on the solid black lines on either side of the auning. Fold the auning up and glue in place. Bend the sides back. Glue on the extra flaps for support. I folded the extra flaps in half and glued them to the bottom of the side flaps. Step 3. For the car, score on all of the dotted lines, then fold. Apply glue to all of the flaps and glue the flaps to the corresponding side. Glue windshield to the front of the car. Step 4. For the snowman costume, cut out the gray circle where the face should be. Wrap the body of the snowman around a toilet tube and secure with tacky glue. Bend your elf to fit inside of the toilet tube. Glue on the included stick arms if you’d like. Step 5. Make a scarf, sunglasses and other props with felt, foam, pom-poms and pipe cleaners! I hope you have an incredibly magical experience with your little ones while trying out these printables this holiday season! Be sure to share the fun and tell me all about your moments of wonder!
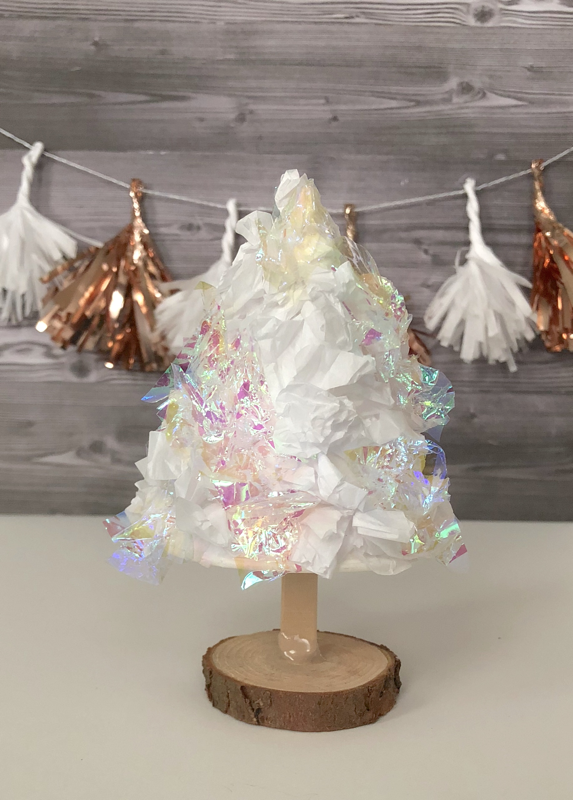
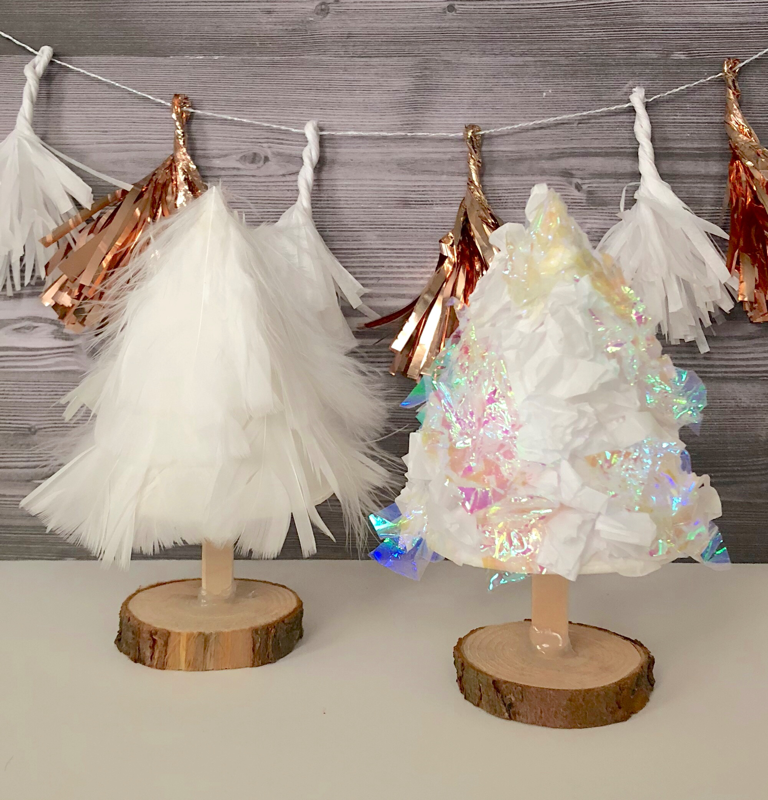
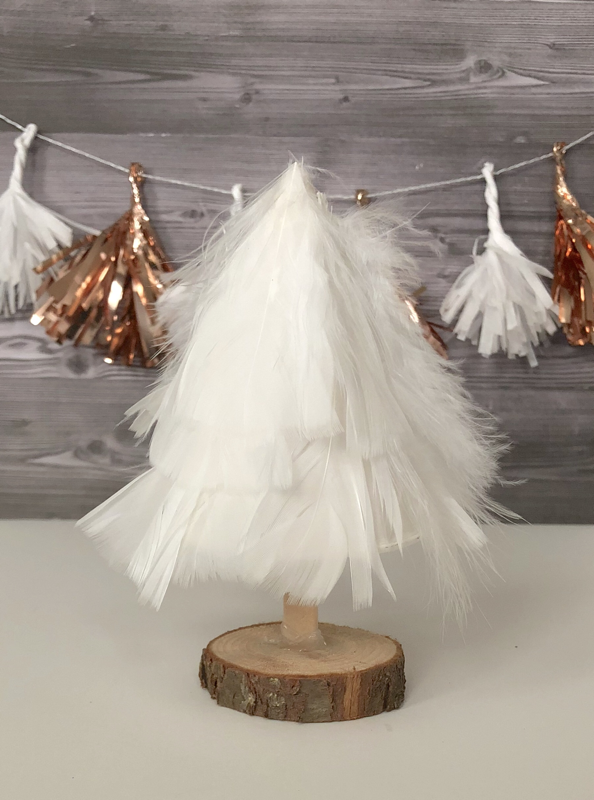
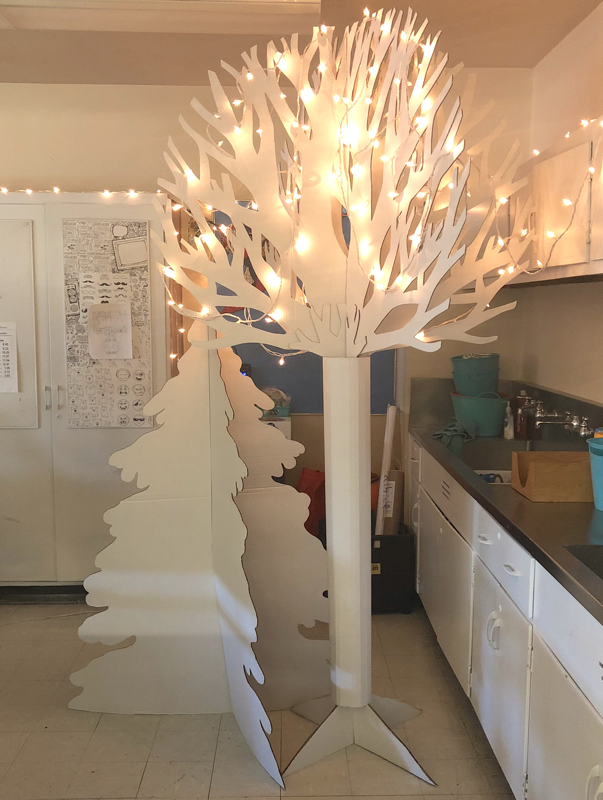
Winter Wonderland Ice Castle & Cardboard TreesThis ice castle created entirely from cardboard and other paper materials is a magical addition to any winter themed room, party or celebration! I had designed and assembled this beauty for a collaborative unit of lessons while I was teaching kids with autism. We displayed their beautiful art work along with this majestic ice castle, it was truly a moment that took everyone’s breath away. All of our students did a fantastic job on their projects as well. 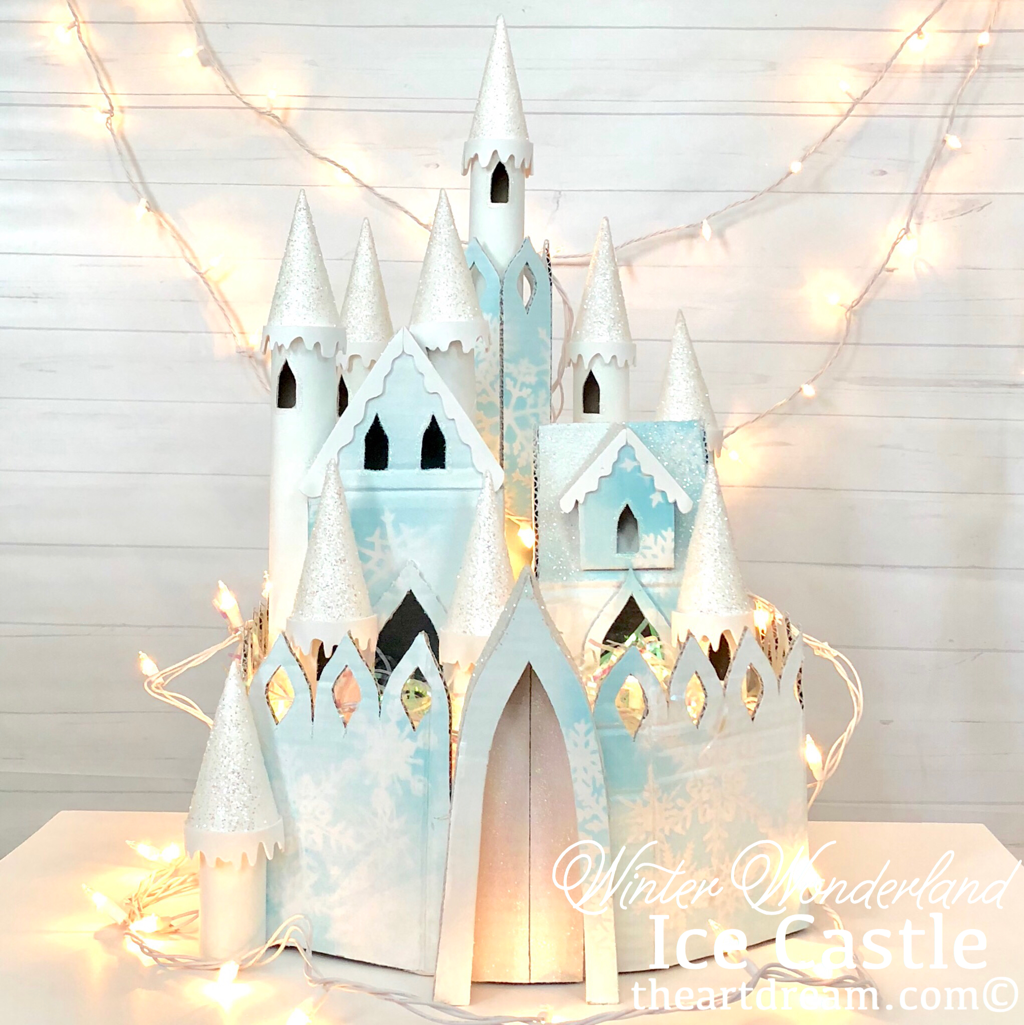 Ice Castle Project I’m sharing this because I’ve decided to display this castle in my classroom to go right along with my winter wonderland theme. I’ve created some large scale trees dripping with white lights to bring the magic of winter into the room. My students love it and I think it’s so important to take the time and really put some care and thought into the appearance of your classroom. I believe that if students get the impression that you pay attention to detail and put an extra amount of effort into the experience then the kids will do the same when it comes to their own work. Think about how you’d feel in an academic setting if the room was bare, neglected or even dirty and dingy? I know I wouldn’t produce my best work because I’d be totally uninspired by the atmosphere. Show kids that you care and I’m sure it’ll go a long way! Check out more of my winter wonderland in the gallery below and be sure to find some inspiration from The Art Dream by looking around on the blog! Take a look at my video of this castle as well, it sure is icy, and pretty! The foundation of the castle is cardboard. The towers are paper towel tubes wrapped with cardstock paper. The turrets are cones made from cardstock paper as well. I added dripping snow around the bottom of the turrets made with white foam. I of course used iridescent glitter to frost the top surfaces. I spray painted parts of the castle and used stencils to get the snowflake appearance. At the very end I placed iridescent shredded paper in the base followed by white string lights! Here are the trees standing tall in my art classroom! They are actually very large and are very majestic! I even created some standing woodland creatures to place around the classroom to fit the narrative. For those I used my Cricut machine to cut out the patterns and then I traced them onto the cardboard and cut them out. My beautiful large winter trees create a frosty environment for a winter wonderland experience!
Black Glue Watercolor PaintingMix black paint with some white glue, outline a drawing and use watercolor paints to fill in the spaces to create a beautiful painting! This is one kind of project that you can whip out anytime, just prepare a half full bottle of white glue by adding in some black craft paint and you have an art project all ready to go when the boredom bug bites! 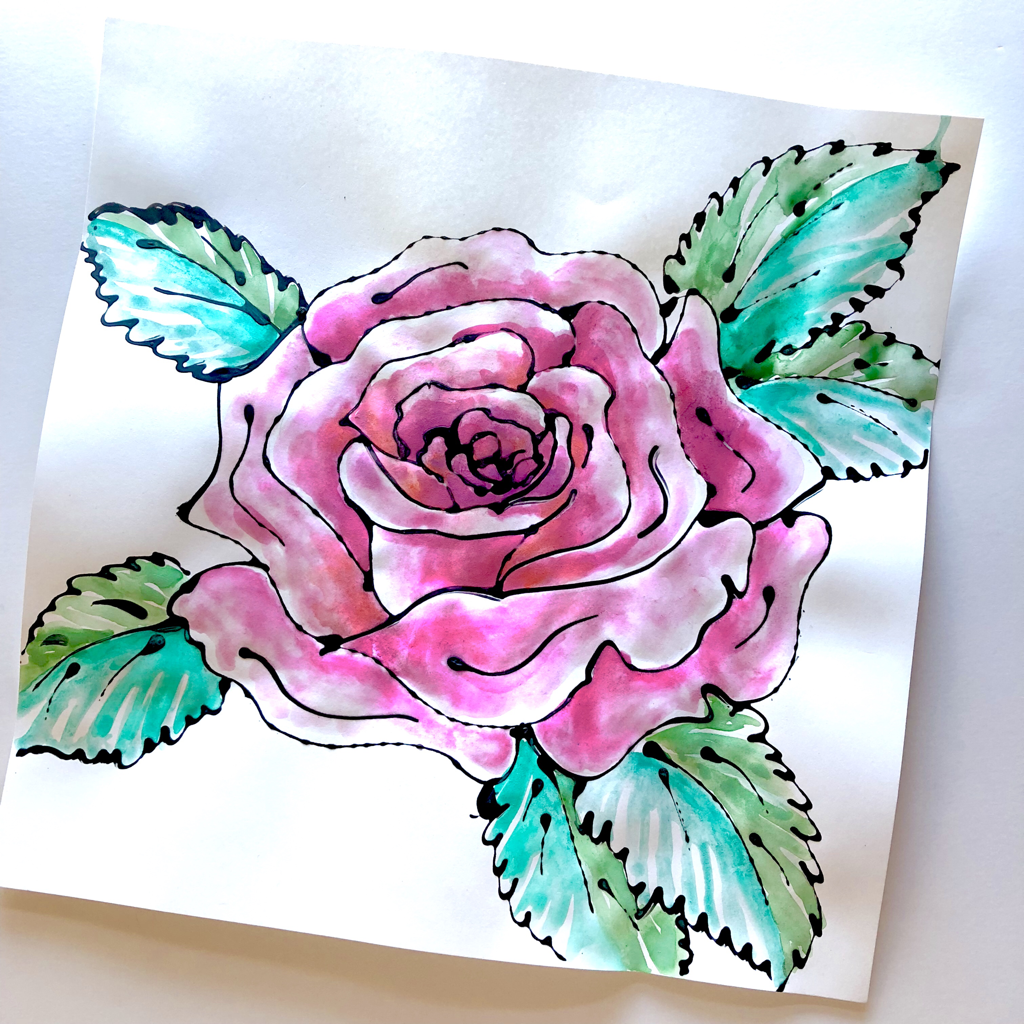 Rose Watercolor Painting Recently I did Halloween watercolor paintings using this technique and I really love it. This is a two part project which is great for the classroom because it will keep the kids busy for a few days. First prepare your glue bottles by pouring in a bit of black craft paint, then give it a good shake to mix it well. You’ll start with a drawing or even a printout, keep it simple though because tracing the drawing with the glue is not precise, you’ll have some bumps and puddling along the way. Trace your outline and then let it dry really well before painting. I like to use watercolor for this type of project but you can use craft paint as well, keep in mind that when normal paper gets wet it wrinkles a bit. If you want a better quality outcome then you should use watercolor paper. For a kids craft though cardstock paper will do just fine. 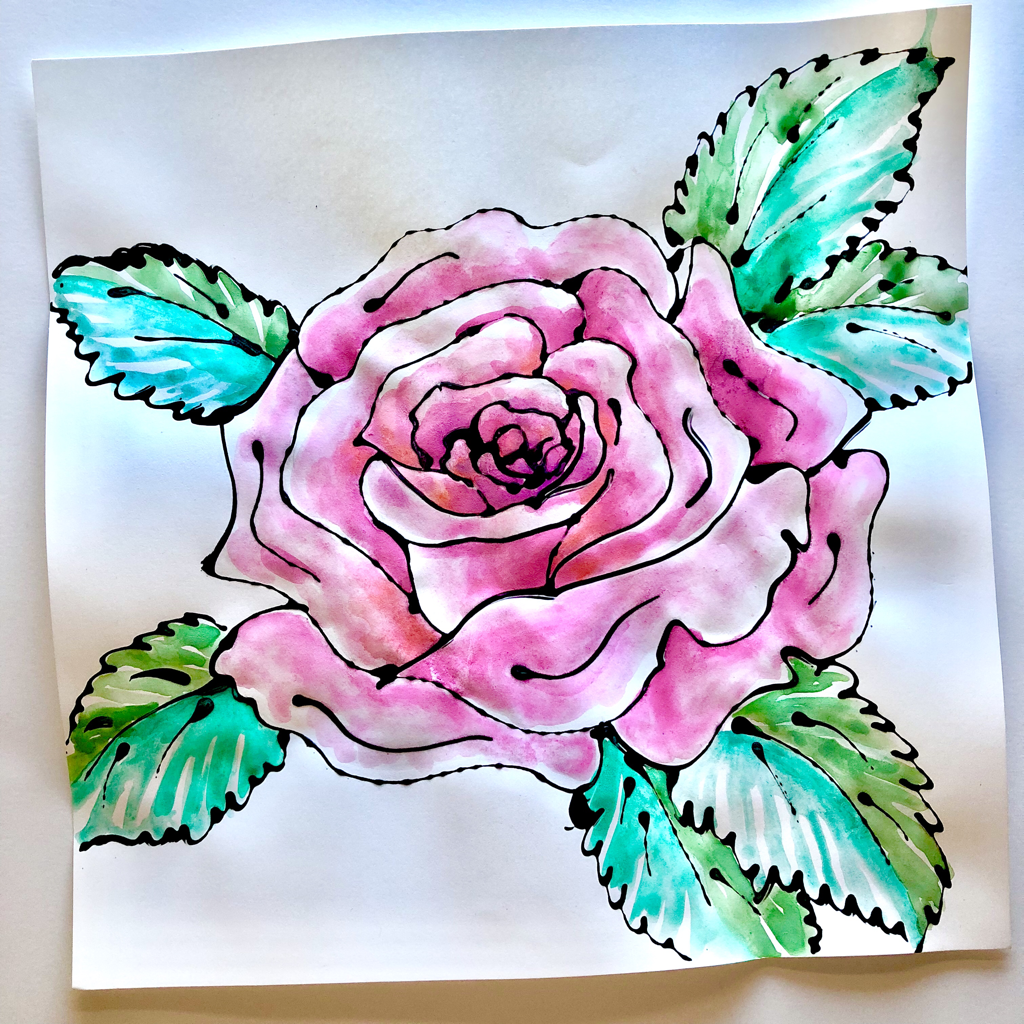 Rose Watercolor Painting This technique can be used anytime of the year for any image, and it’s rustic look pairs greatly with watercolors, remember to be creative and have fun. Add your own details too like glitter, or feathers or foam shapes for dimension!
|
AuthorI'm John, an artist and art educator. The Art Dream is here to spark creativity and inspire the little artist inside of you! Archives
October 2021
Categories
Ice Dragon Head Printable
$1.00
Feel the icy breath of this mighty dragon, it’s a dance of fire and ice that’ll leave you in awe. Just add your own streamers to create that blast of blustery snow!
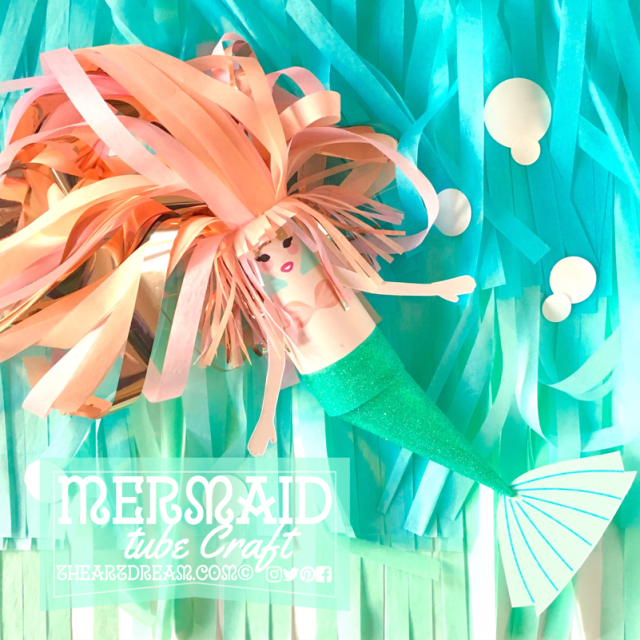
Mermaid Tube Craft Printable
$1.00
Who would dream about the world above the sea when you could dream about the world that is under the sea, where such beautiful creatures like this mermaid must exist! Don't they? I've started your journey of crafting this beautiful sea creature, it's up to you to add magical hair and dress up her fins!
|
||


 RSS Feed
Proudly powered by Weebly